

webpack 源码分析
![]()
webpack 是一个现代 JavaScript 应用程序的静态模块打包器(module bundler)
概念
webpack 是一个高度可配置的,想要驾驭它你必须首先理解其 4 个核心概念:
- 入口 enry
- 输出 output
- loader
- 插件 plugins
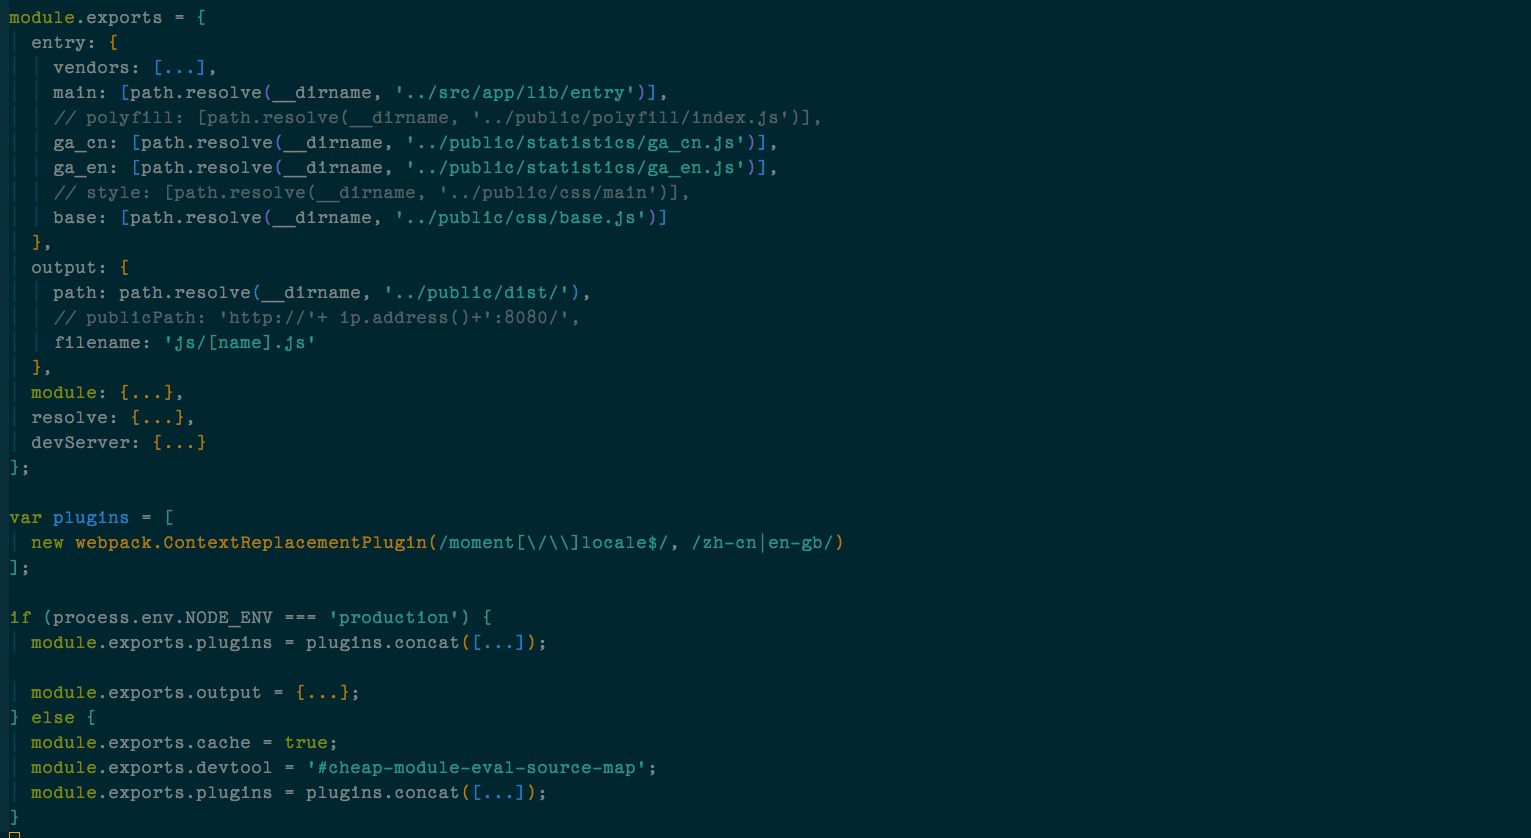
上图是 webpack 配置文件的一个🌰
除此之外还有 模式 这个概念,主要是 webpack 根据不同模式开启相应的内置的优化。
注意:新版文档加入 Browser Compatibility
webpack supports all browsers that are ES5-compliant (IE8 and below are not supported). webpack needs
Promiseforimport()andrequire.ensure(). If you want to support older browsers, you will need to load a polyfill before using these expressions.
机制
本文的分析是基于 webpack 3.11.0 了,新的版本支持了一些新的特性,不在讨论范围。
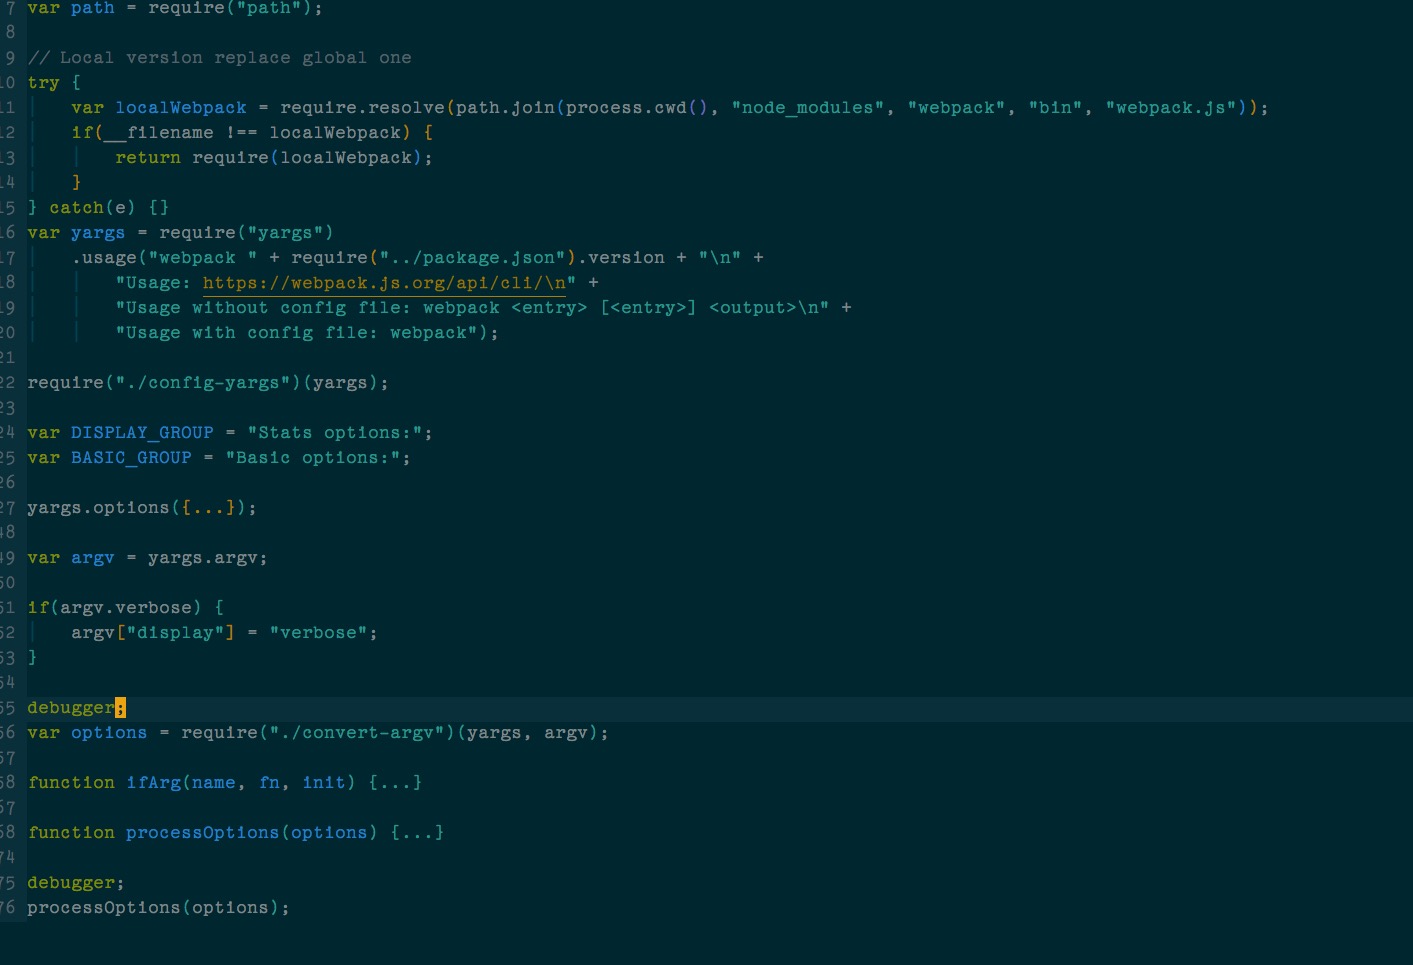
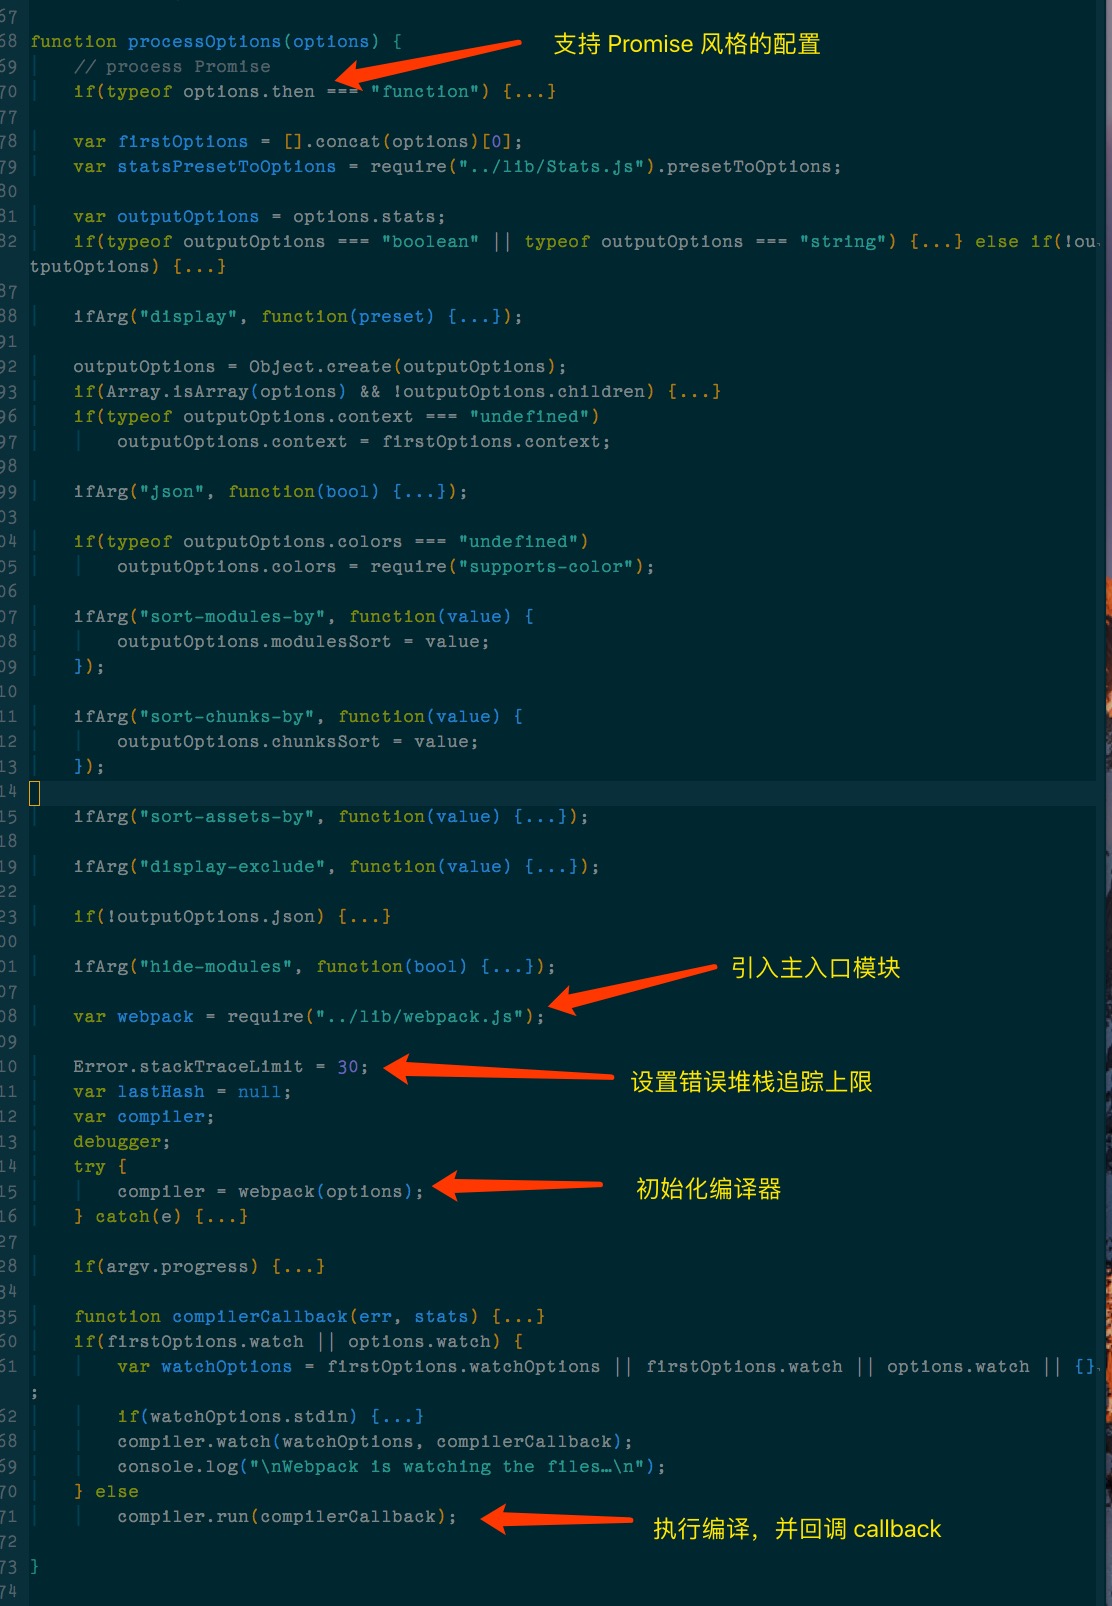
上述的源码截图可以清晰地看到执行 webpack 命令时会做什么处理,主要是解析命令行参数以及执行打包,其中 processOptions 就是 /bin/webpack.js 的核心函数。
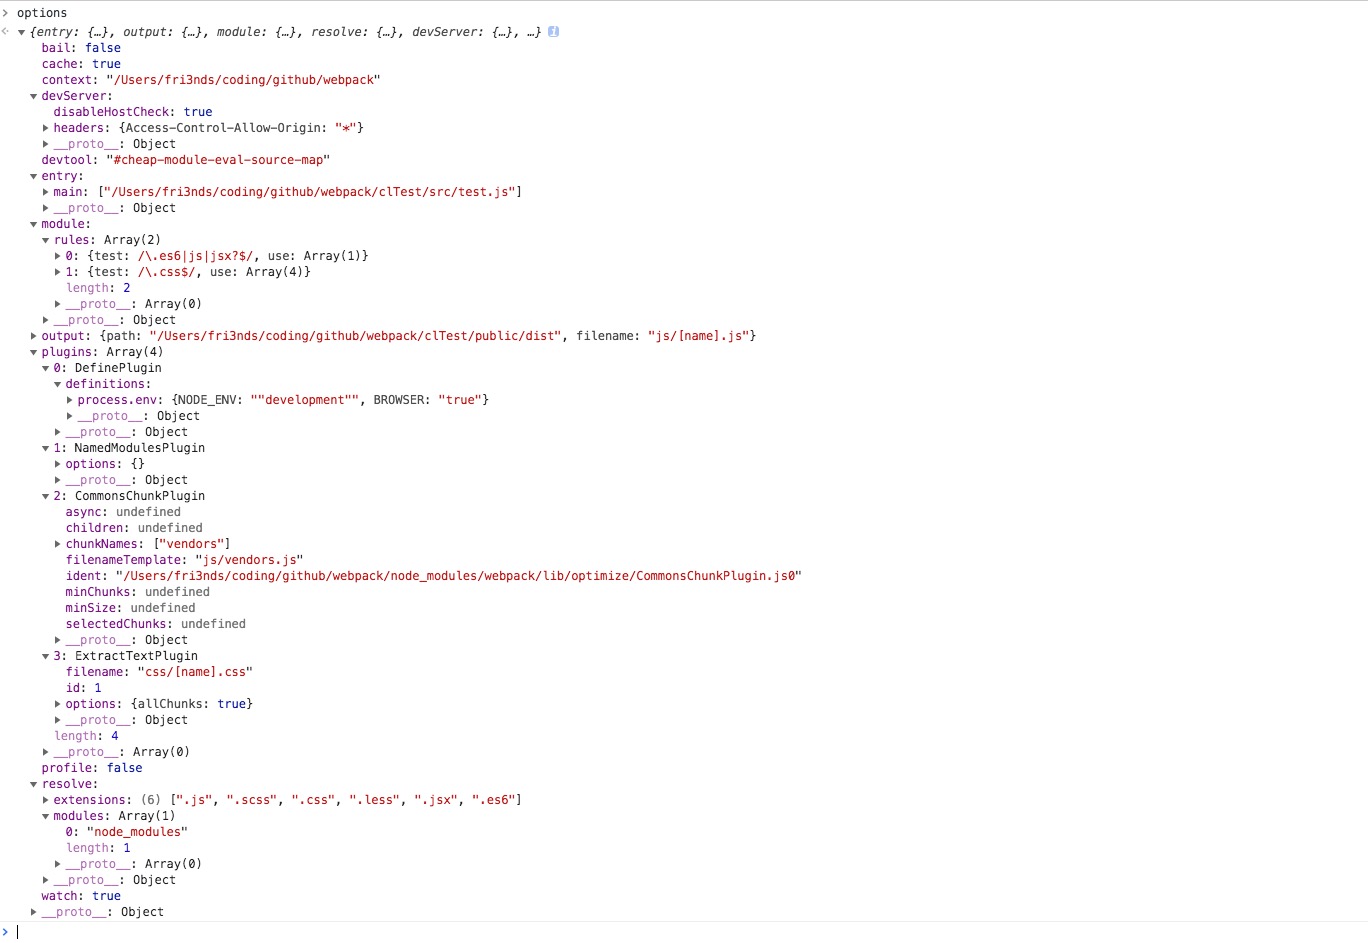
解析出来的 options 参数
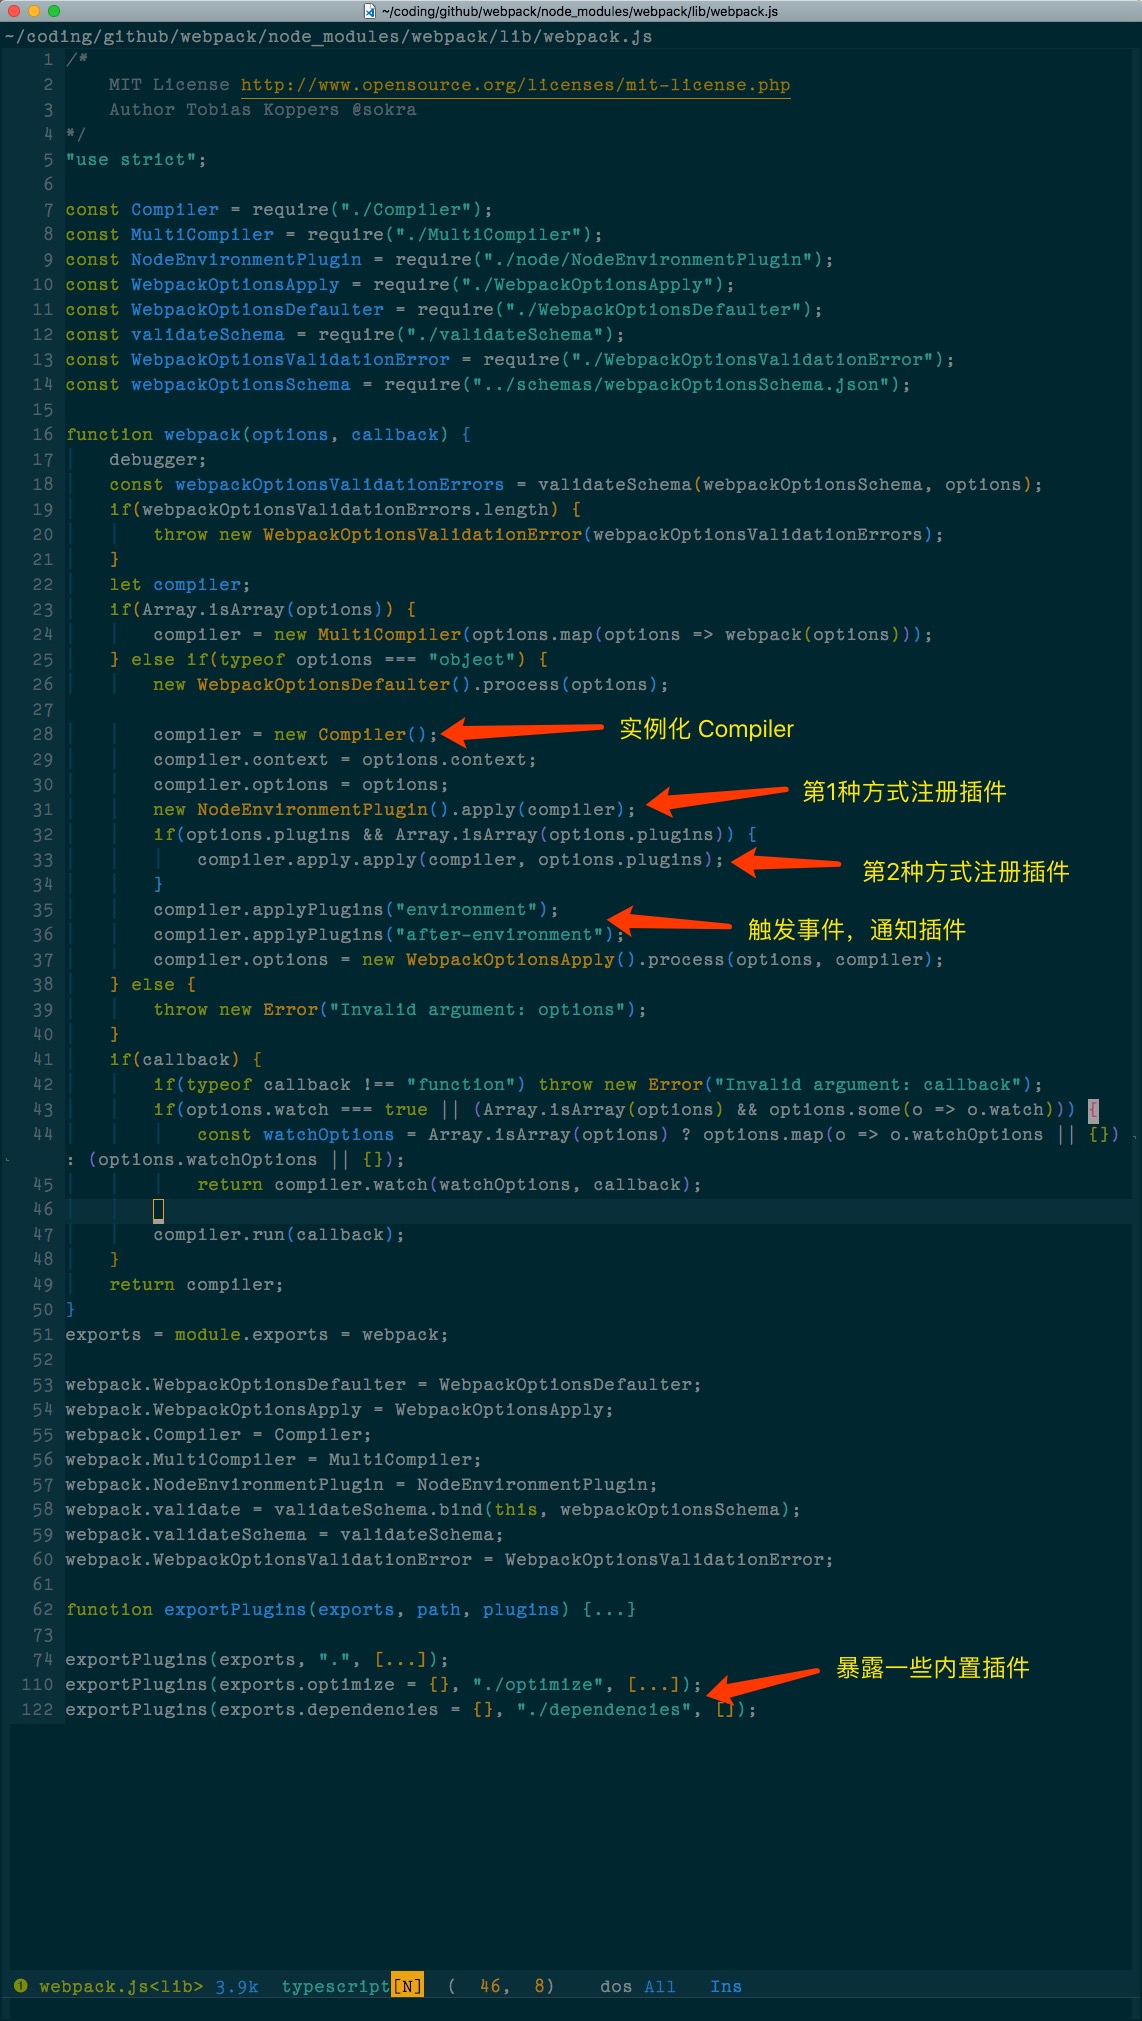
上述 webpack 函数里,有两点需要注意下:
-
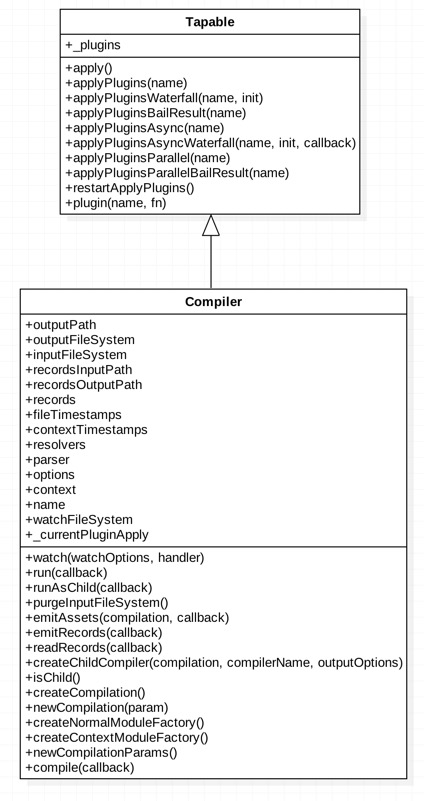
Compiler,Compiler 类继承 Tapable,这个 Tapable 是一个插件框架,通过继承它的一系列方法来实现注册和调用插件,我们可以看到在 webpack 的源码中,存在大量的 compiler.apply、compiler.applyPlugins、compiler.plugin 等Tapable方法的调用。Webpack 的 plugin 注册和调用方式,都是源自 Tapable 。Webpack 通过 plugin 的 apply 方法安装该 plugin,同时传入一个 webpack 编译对象(Webpack compiler object)。
-
compiler.options = new WebpackOptionsApply().process(options, compiler) 这个方法将会针对我们传进去的
compiler进行一些操作,那么干了什么呢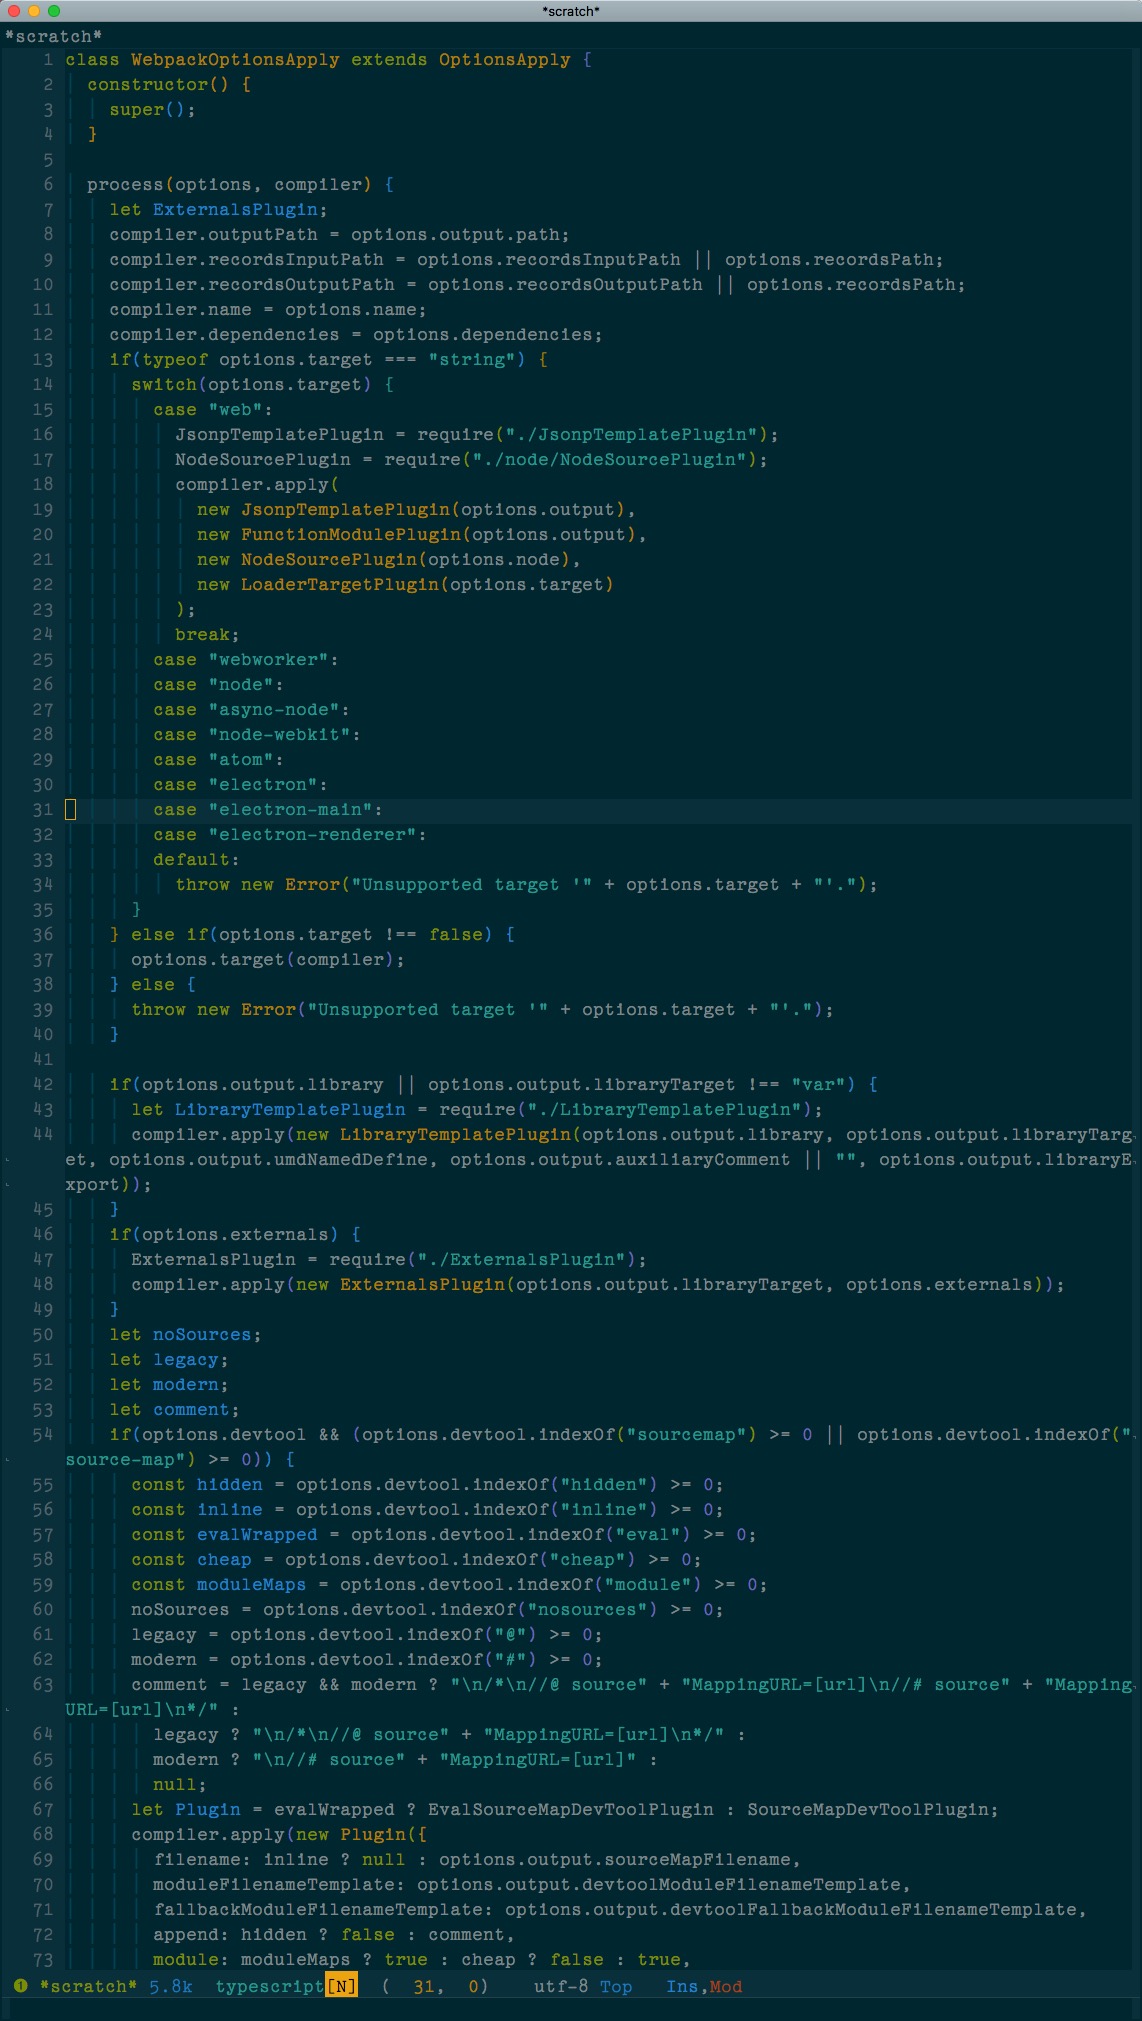
写了很多代码,总结下来就干了 3 件事情
-
把
options上的配置信息复制到compiler上 -
支持了一下不同 target(
有本事,你支持 React Native 环境啊),并注册了不同 target 的内置插件 -
注册了大量内置插件
-
编译与主流程
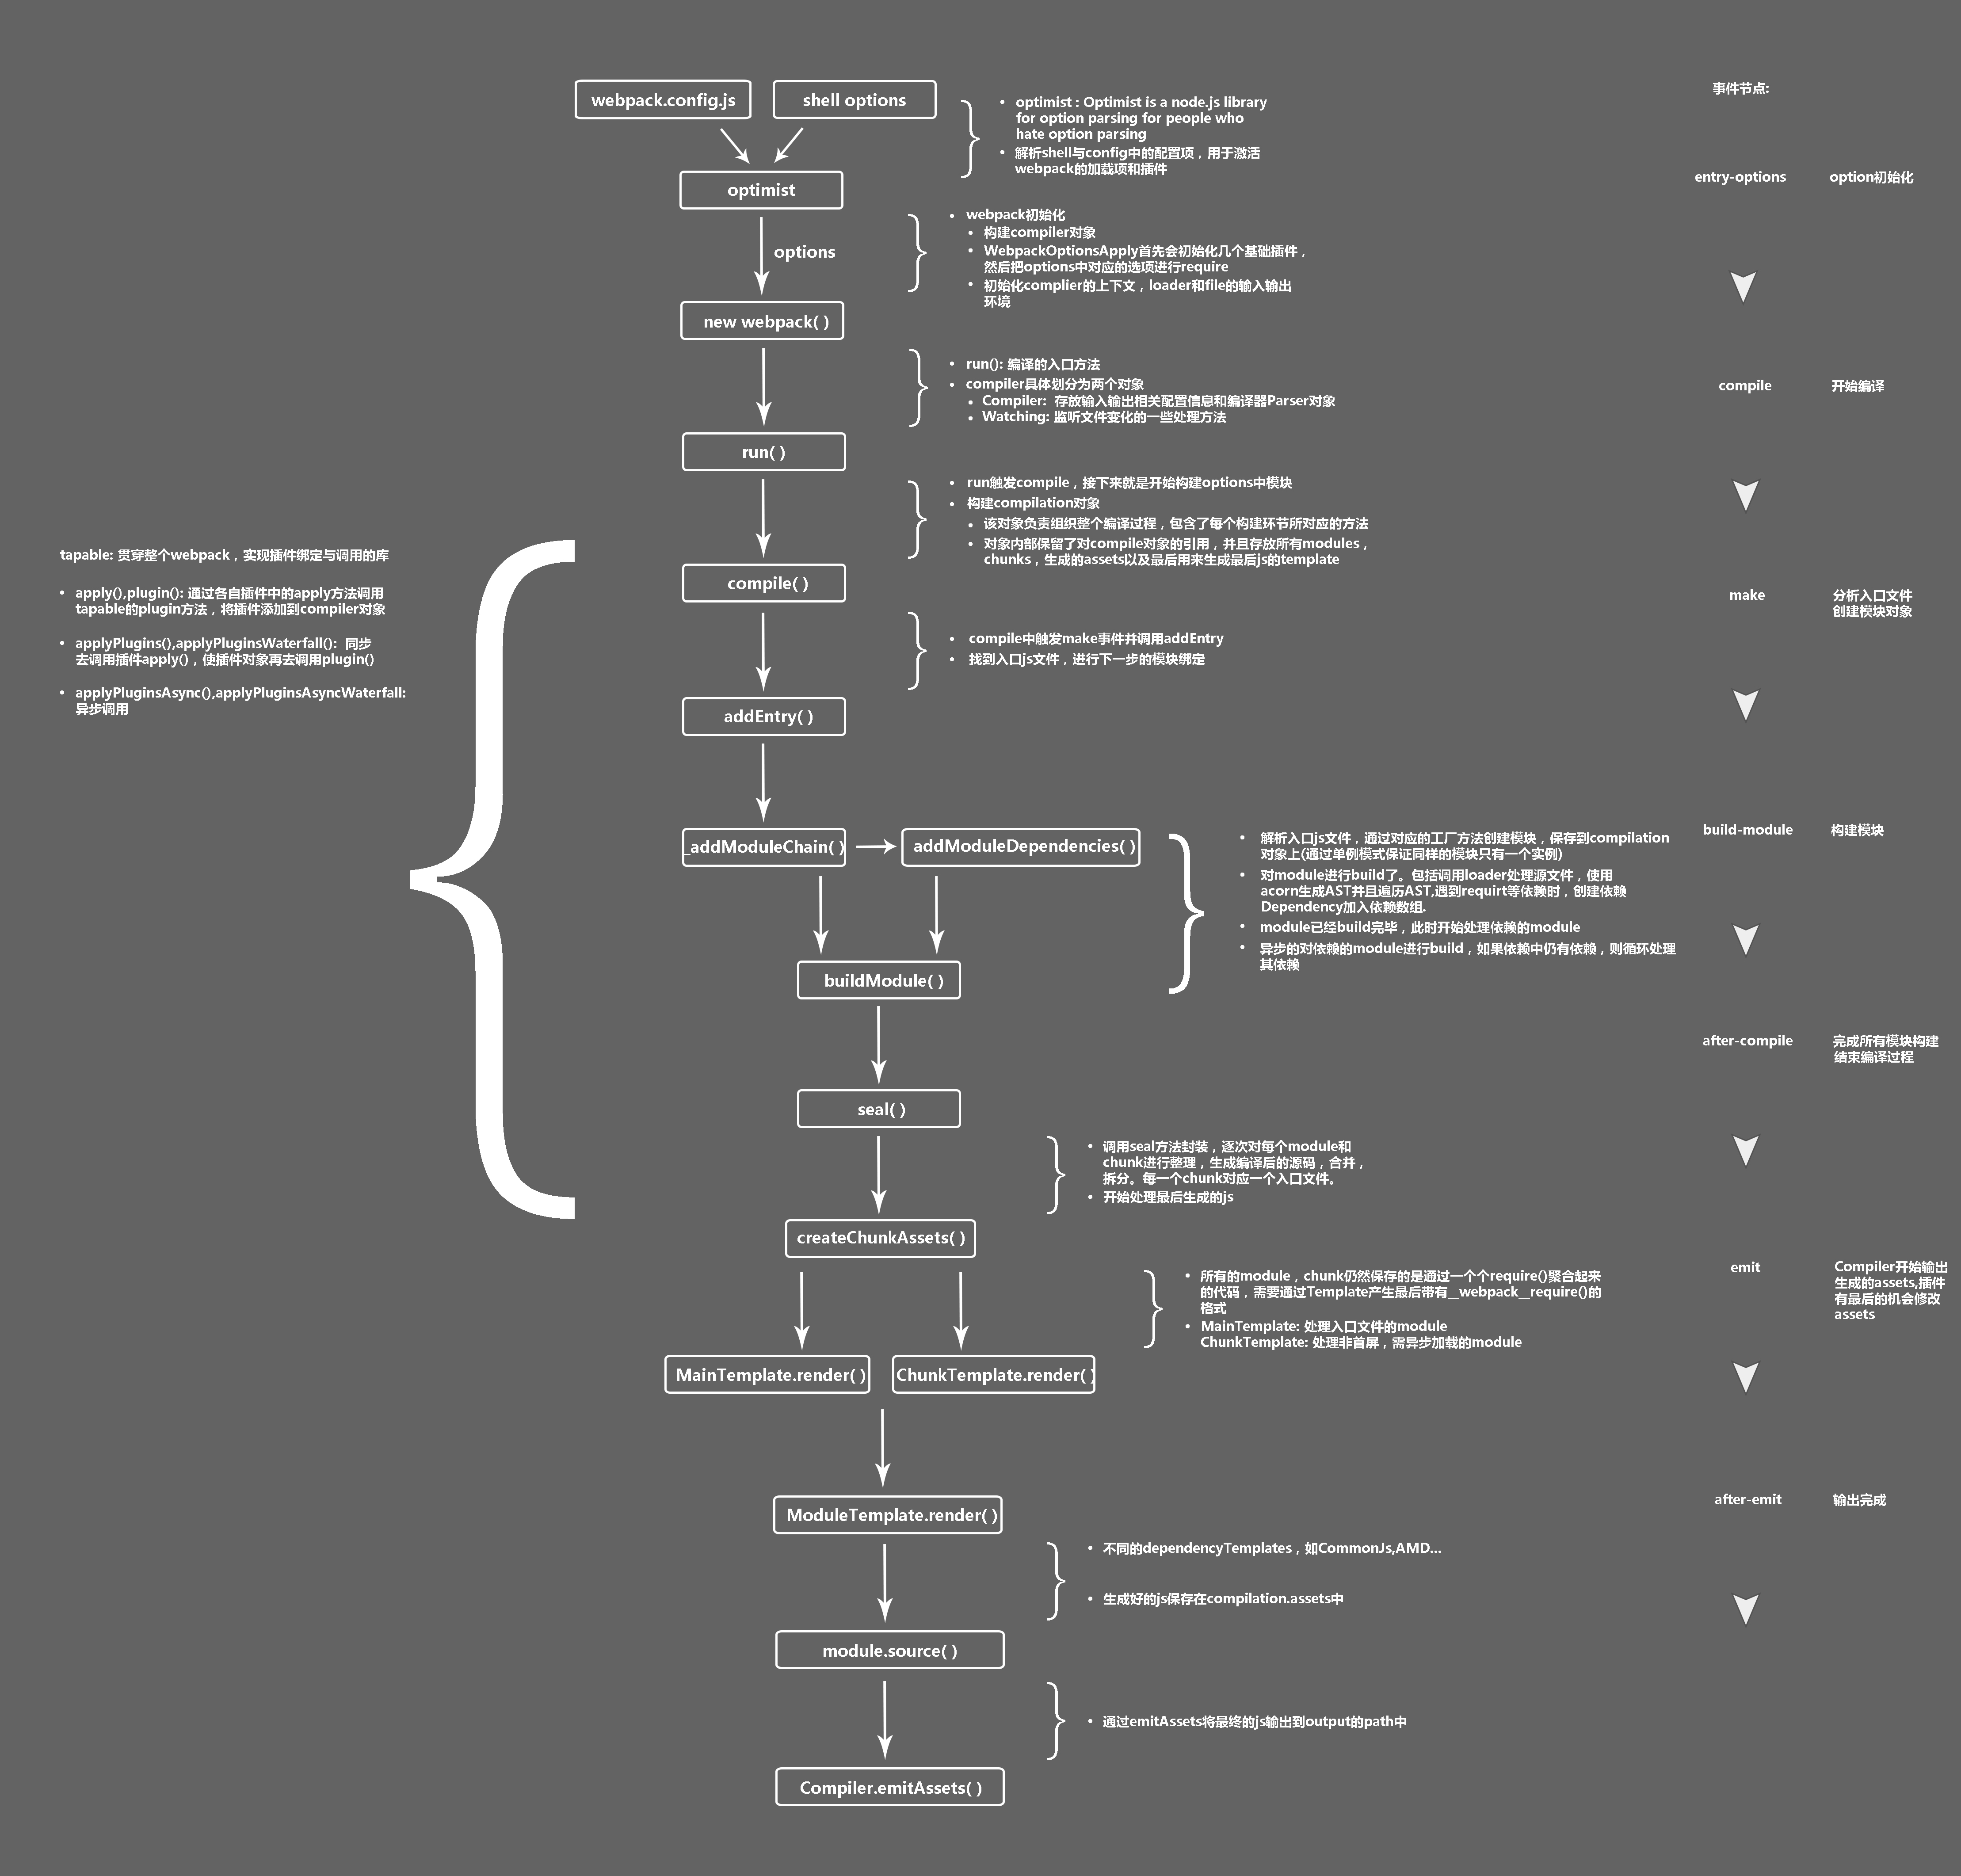
webpack 的实际入口是 Compiler 中的 run 方法,run 一旦执行后,就开始了编译和构建流程 ,其中有几个比较关键的 webpack 事件节点。具体的事件节点,webpack 提供了详细的 hooks
-
entry-option初始化 option -
run开始执行 -
compile开始编译 -
make从入口点分析模块及其依赖的模块,创建这些模块对象 -
before-resolve触发factory事件 -
factory触发resolver事件 -
build-resolveafter-resolve对其中一个模块位置进行解析 -
build-module开始构建(build)这个 module,这里将使用文件对应的 loader 加载 -
after-compile完成构建 -
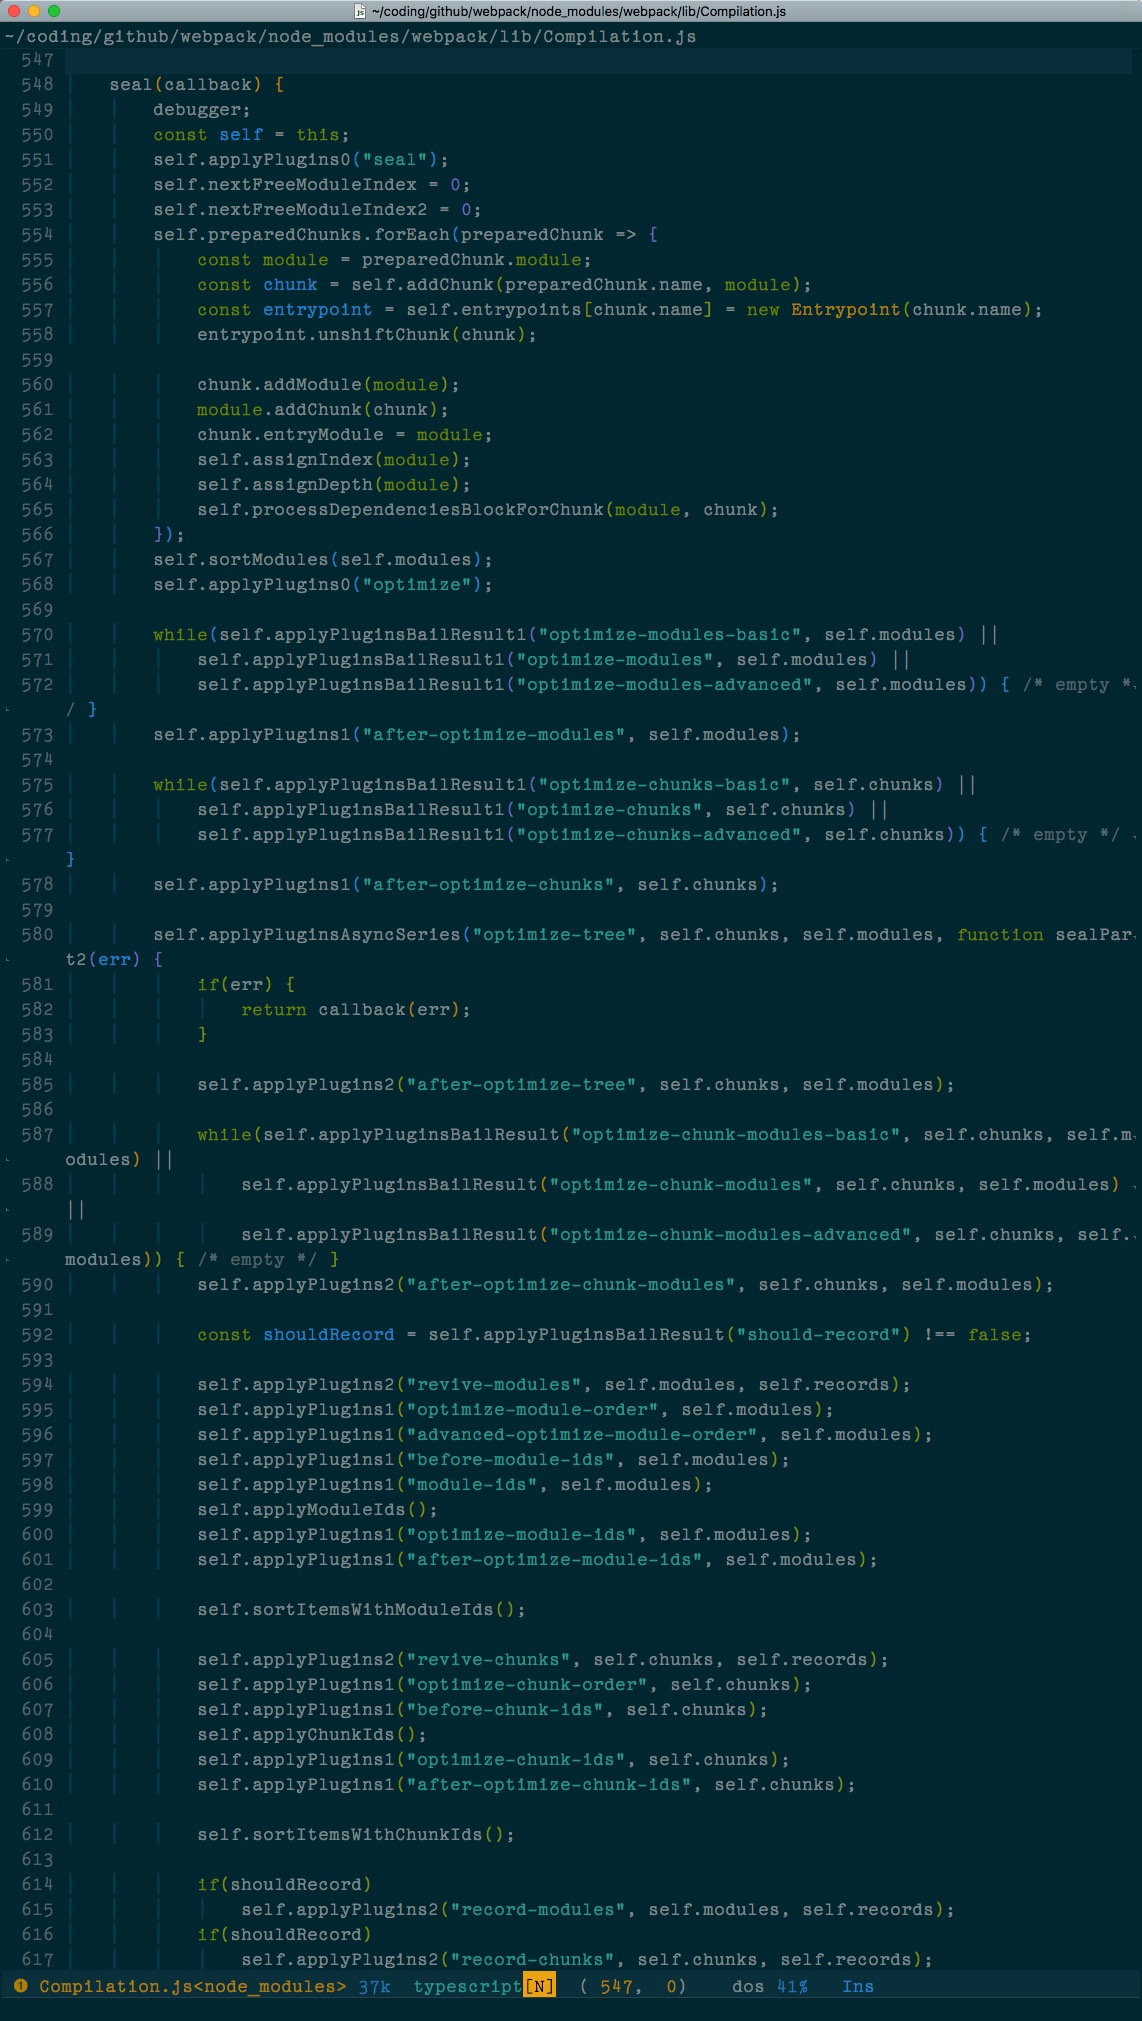
seal封装构建结果 -
emit把各个 chunk 输出到结果文件 -
after-emit完成输出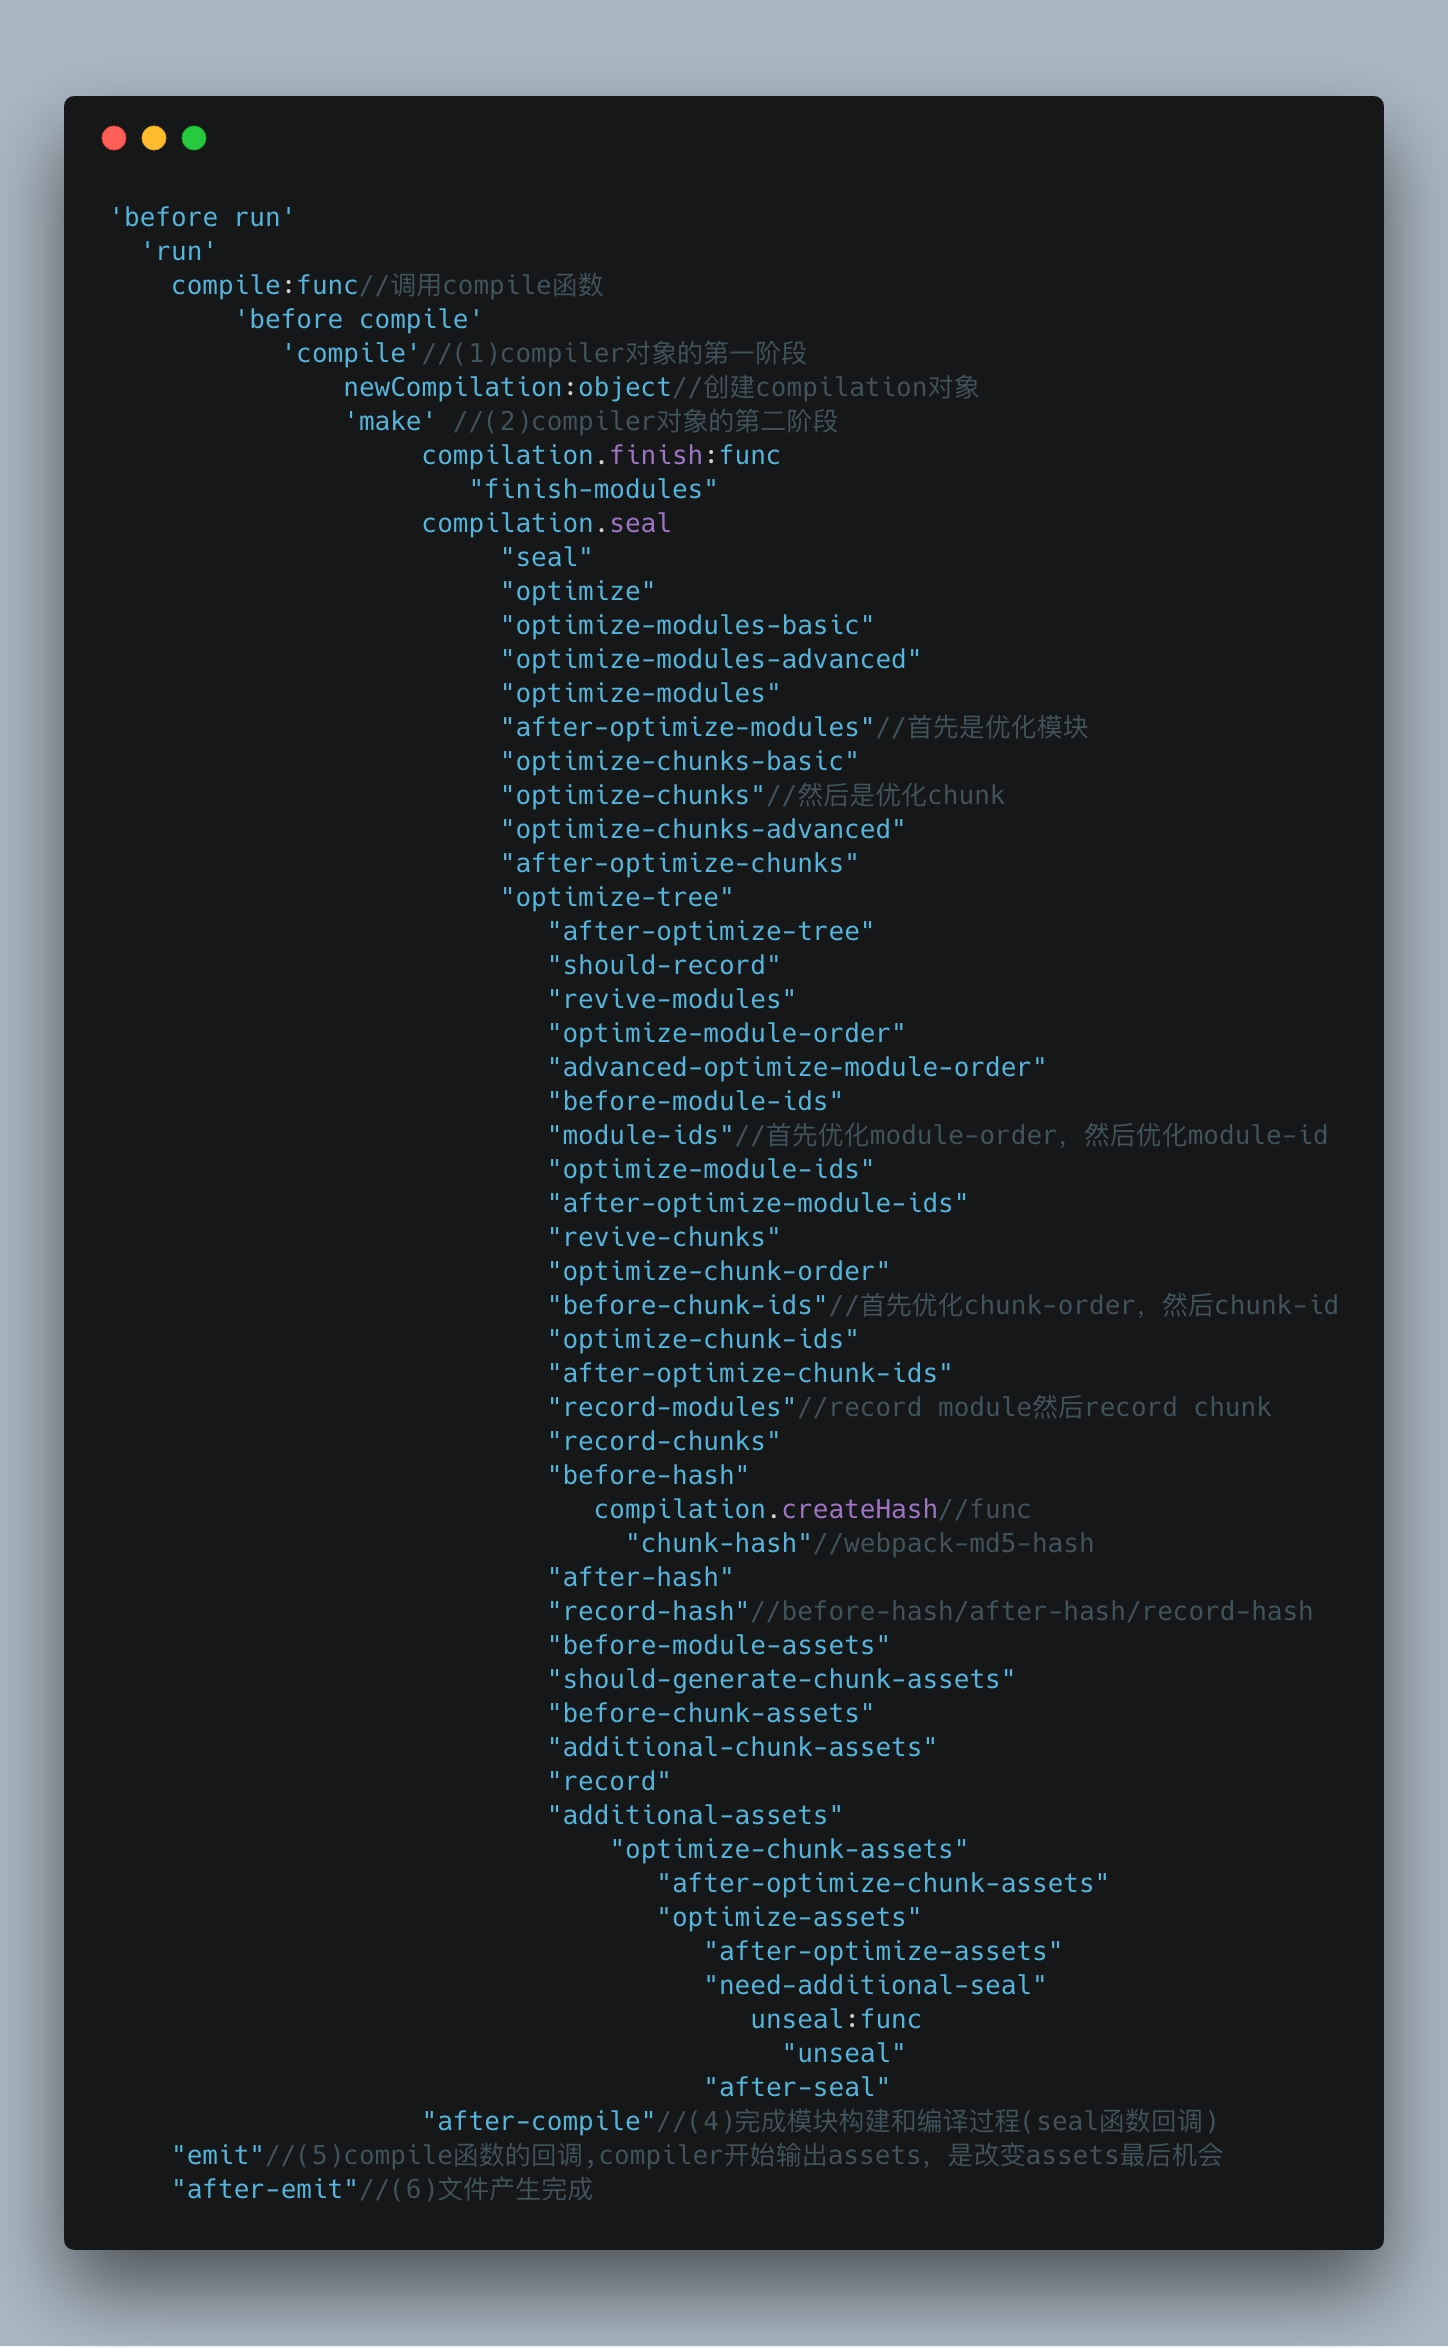
1. run
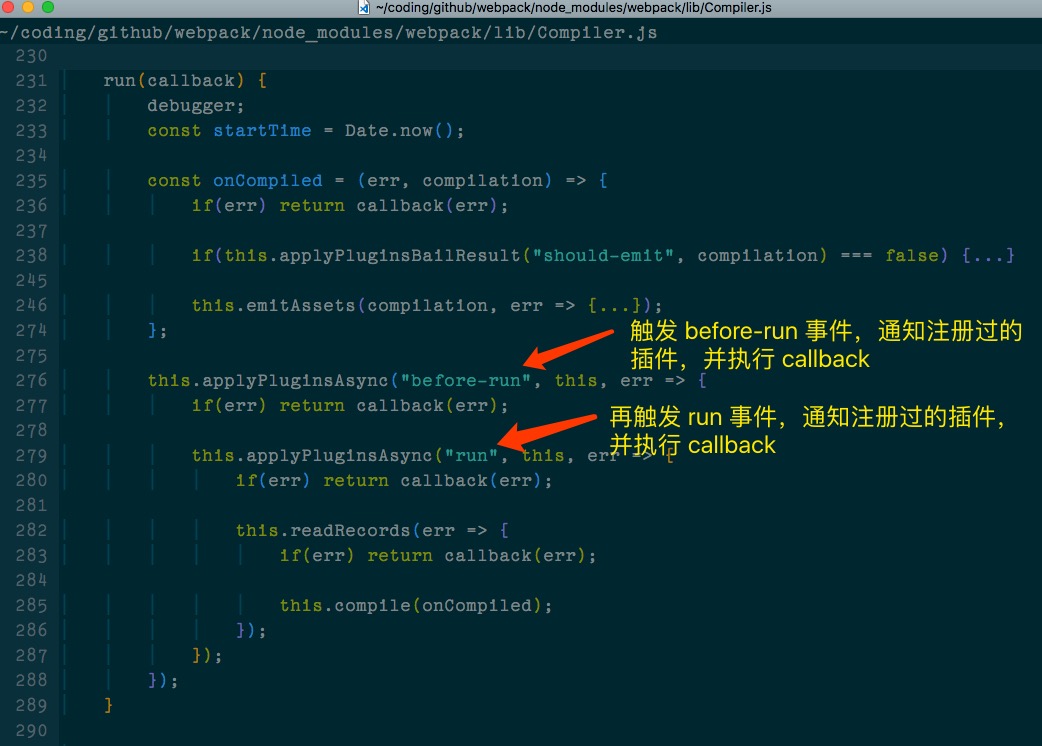 执行了 before-run 和 run 之后,开始调用 compiler.compile 方法
2. compile
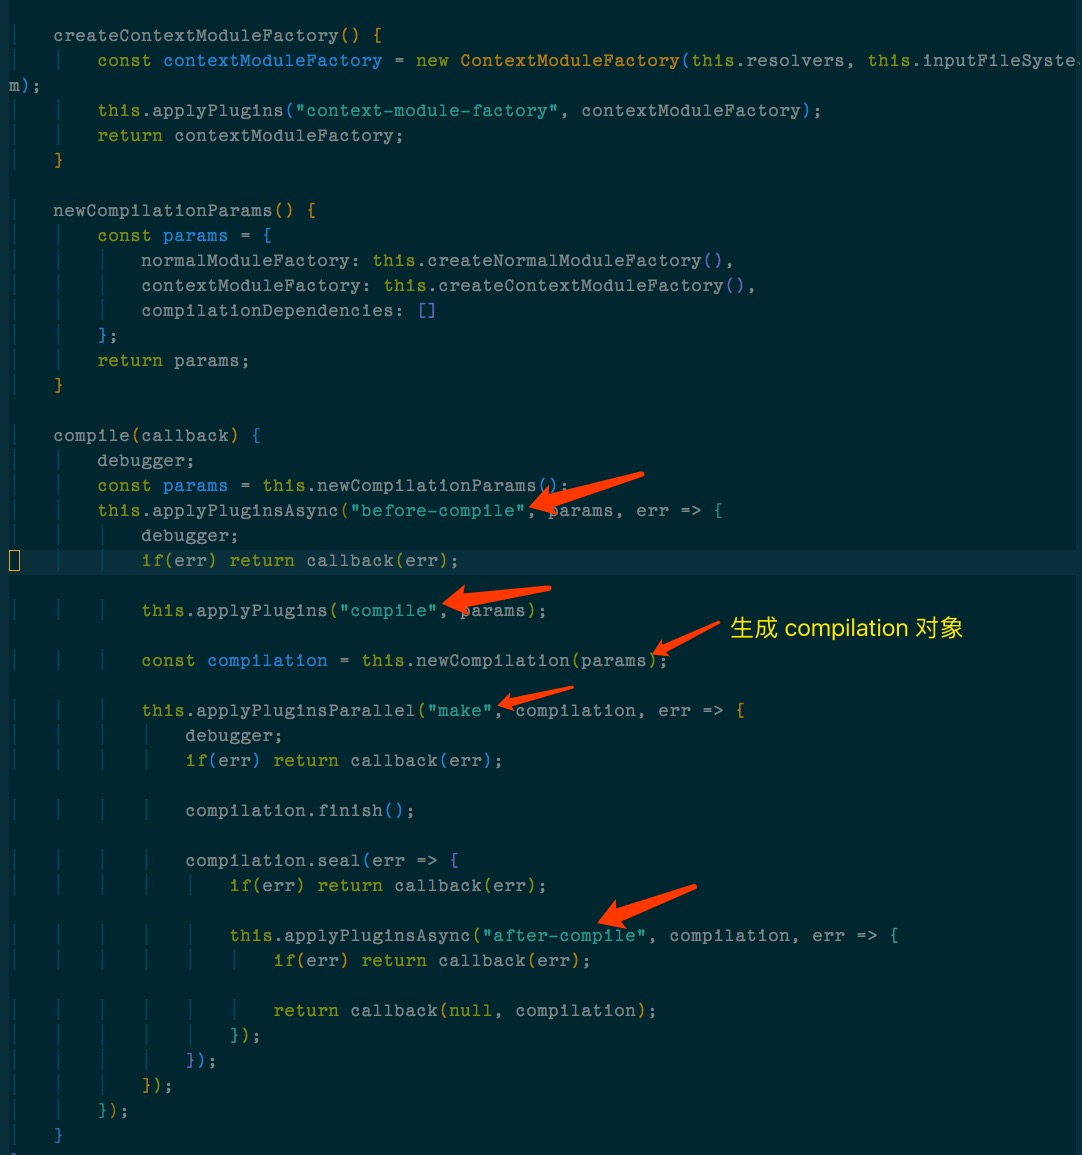
调用 compiler.compile 方法,首先触发 before-compile 然后触发 compile 事件,然后构建 compilation 实例
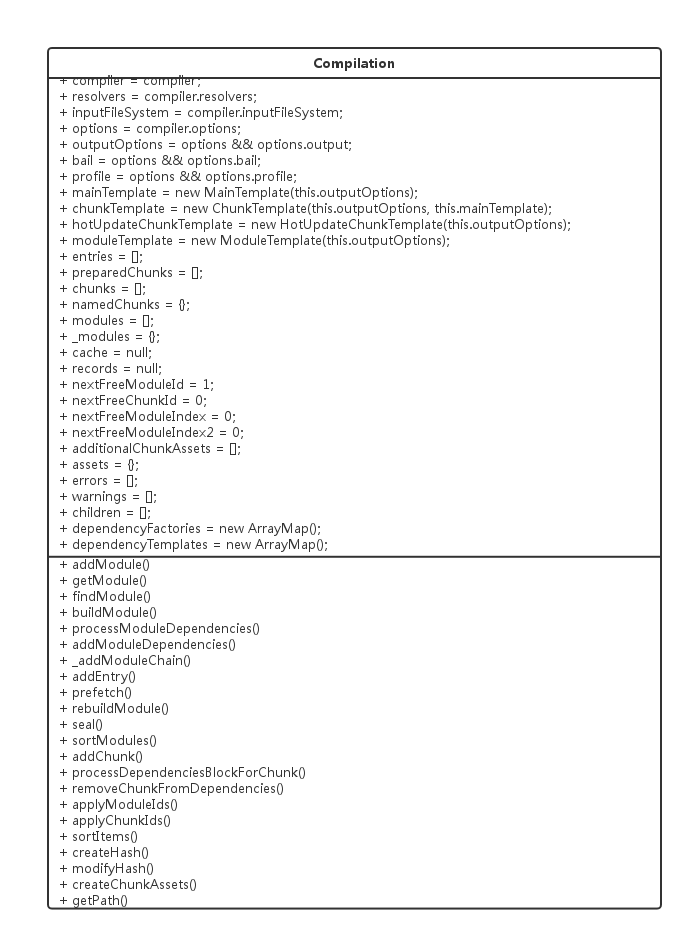
这个对象有两个作用,一是负责组织整个打包过程,包含了每个构建环节及输出环节所对应的方法,可以从图中看到比较关键的步骤,如 addEntry(), _addModuleChain(), buildModule(), seal(), createChunkAssets() (在每一个节点都会触发 webpack 事件去调用各插件)。二是该对象内部存放着所有 module ,chunk,生成的 asset 以及用来生成最后打包文件的 template 的信息。
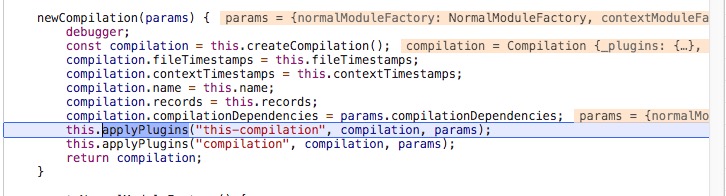 上图可以看到初始化 compilation 的过程中,还触发了
 this-compilation 和 compilation 两个事件
this-compilation 事件触发 CommonsChunkPlugin 插件,在这个时候执行了,往 compilation 上注册了 optimize-chunks 和 optimize-extracted-chunks 两个事件
还触发了 extract-text-webpack-plugin 插件,其在执行的时候,往 compilation 上注册了 normal-module-loader 事件。
compilation 事件就更厉害了,触发了一堆插件。
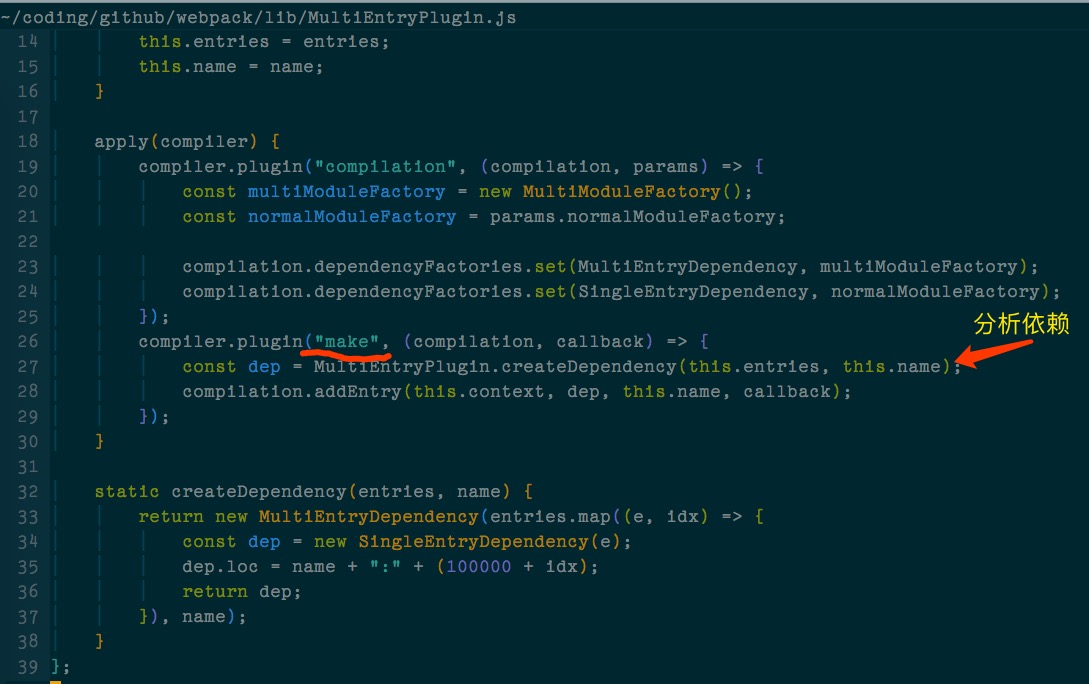
3. make
在初始化 compilation 后,就开始了 make 的阶段。
// MultiEntryDependency.js
const Dependency = require("../Dependency");

class MultiEntryDependency extends Dependency {
	constructor(dependencies, name) {
		super();
		this.dependencies = dependencies;
		this.name = name;
	}

	get type() {
		return "multi entry";
	}
}

module.exports = MultiEntryDependency;


// SingleEntryDependency.js
const ModuleDependency = require("./ModuleDependency");

class SingleEntryDependency extends ModuleDependency {
	constructor(request) {
		super(request);
	}

	get type() {
		return "single entry";
	}
}

module.exports = SingleEntryDependency;

// ModuleDependency.js
const Dependency = require("../Dependency");

class ModuleDependency extends Dependency {
	constructor(request) {
		super();
		this.request = request;
		this.userRequest = request;
	}

	isEqualResource(other) {
		if(!(other instanceof ModuleDependency))
			return false;

		return this.request === other.request;
	}
}

module.exports = ModuleDependency;
好像什么🐂逼的事情都没有干啊! 初始化好 dependencies(dependencies 是一个 SingleEntryDependency 实例的array) 后,就开始了 compilationl.addEntry 方法。 在 addEntry 中调用私有方法 _addModuleChain。这个方法主要做了两件事情,一是根据模块的类型获取对应的模块工厂并创建模块,二是构建模块。
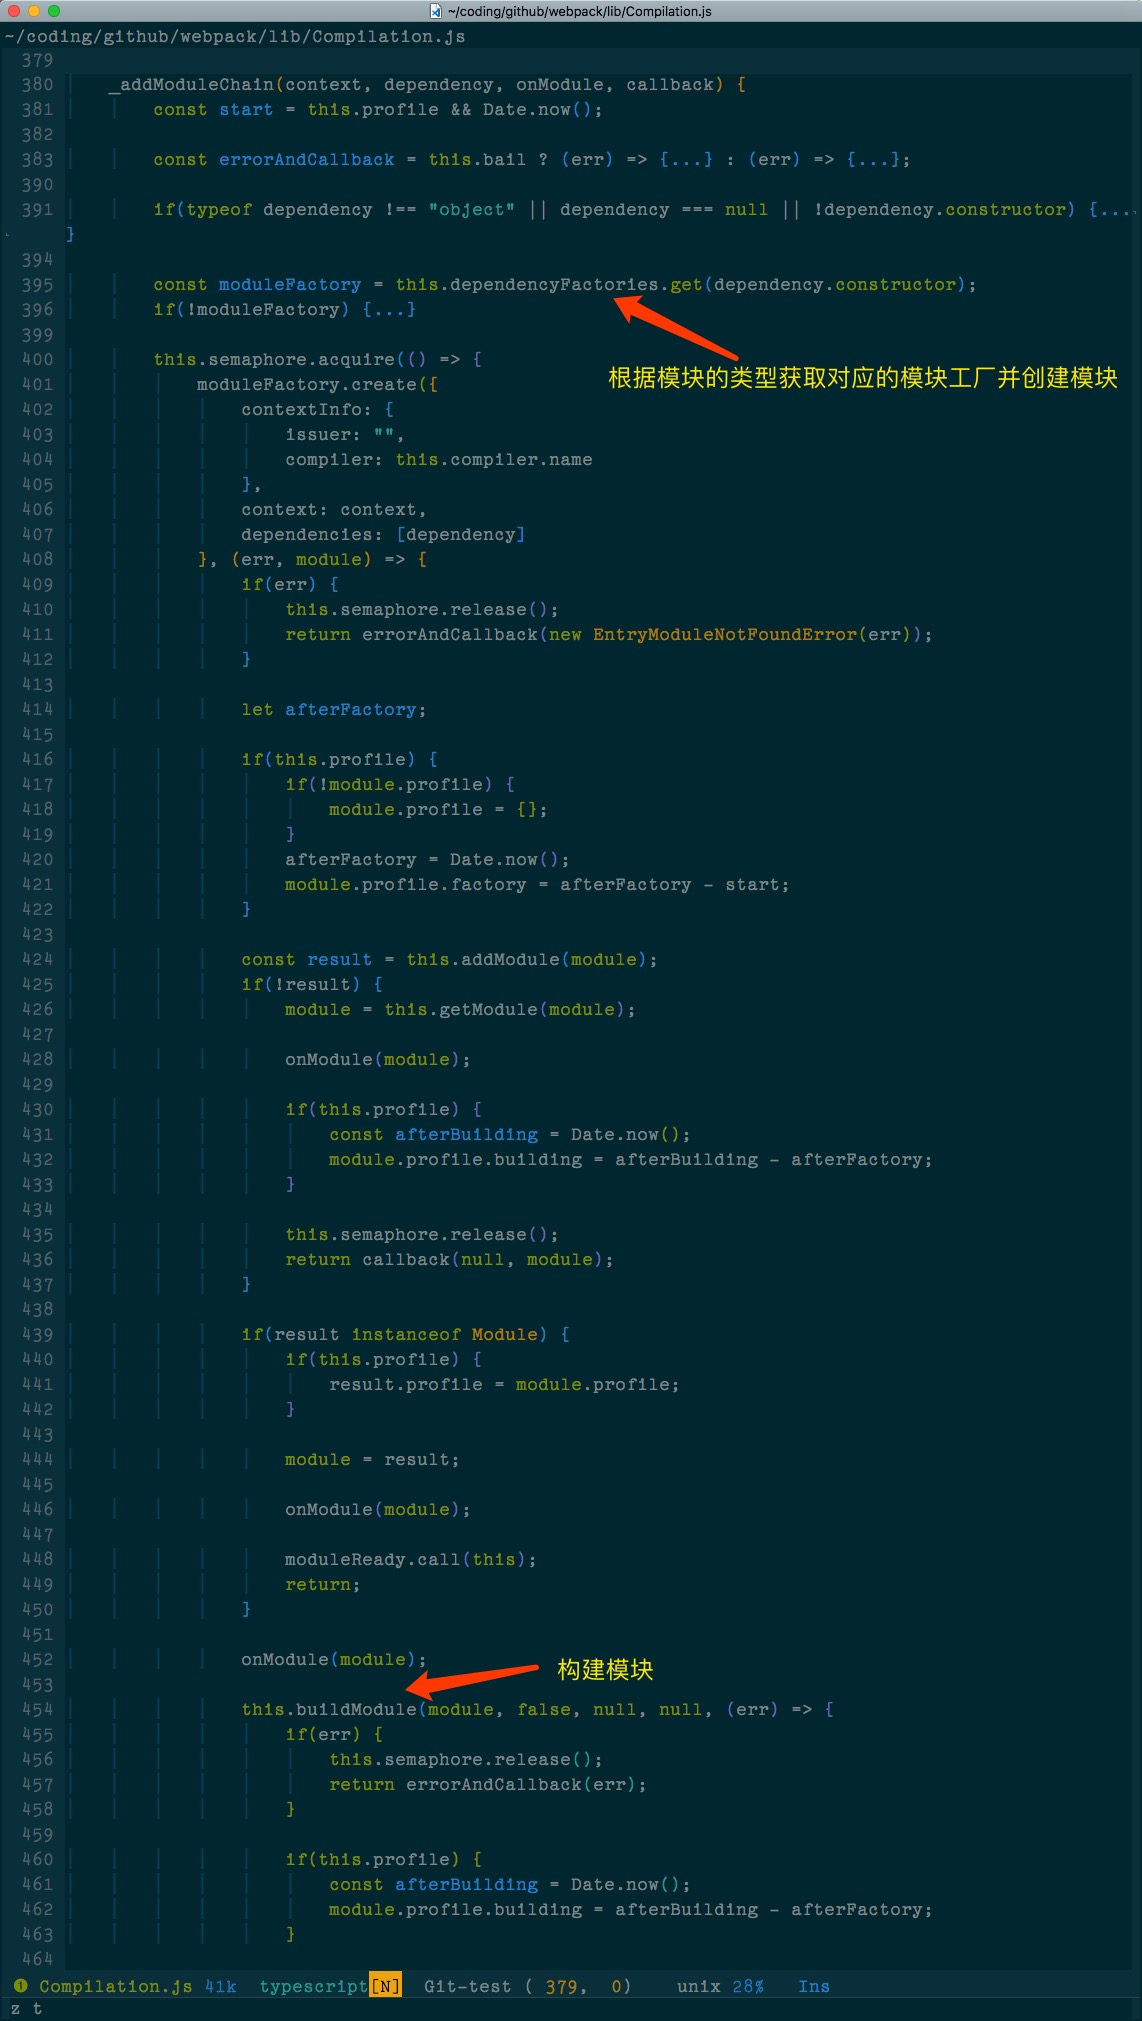
在之前触发 compilation 后,很多插件往 compilation.dependencyFactories 这个 Set 塞了很多模块工厂。
取出对应的模块工厂,调用其静态方法 create, 初始化 Module 实例。
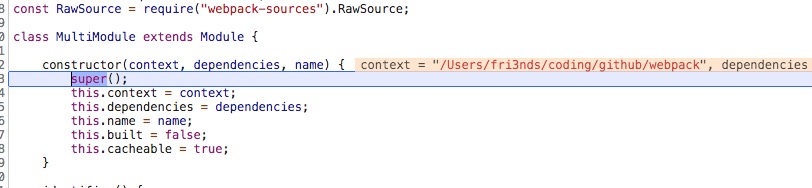
然后调用了 compilation.addModule 方法,将 module 存储在 compilation.modules 这个数组里,并返回 true 表示添加成功。
之前 MultiEntryPlugin.createDependency 根据 entry 创建了 MultiEntryDependency 实例。
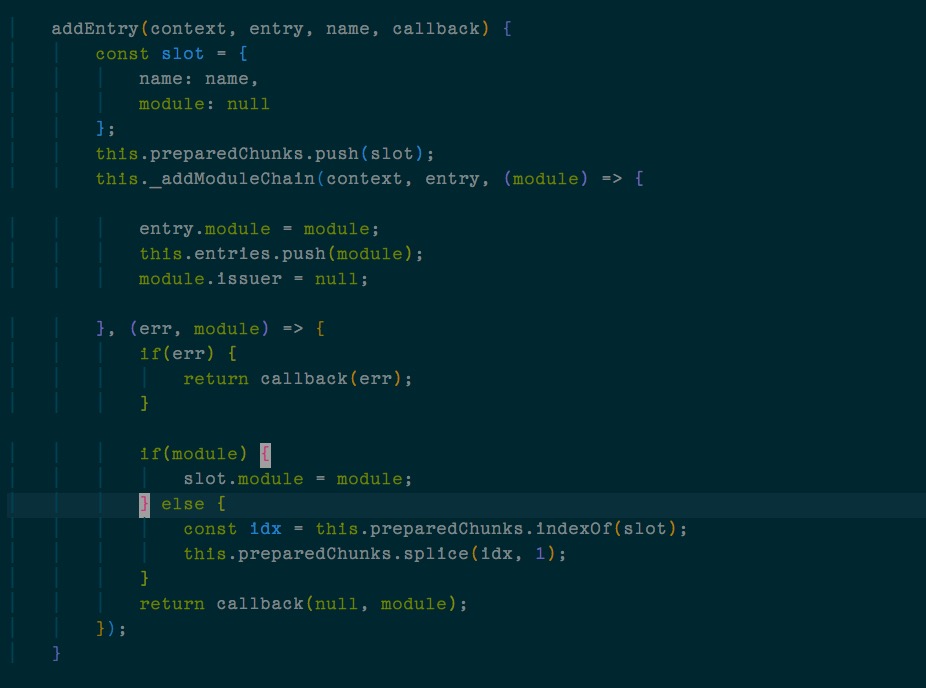
将 module 绑定到 entry 上,又将 module 存储到了 compilation.entries 数组里。
buildModule 函数内部,触发build-module 事件,调用 module.build 方法。就是简单地将 module.built 置为 true,最后调用 compilation 里面的 moduleReady 方法,进而调用 compilation.processModuleDependencies 方法。
中间从 module.dependences 递归拿到 SingleEntryDependency 对应的 factory,其中触发 build-resolve 事件,factory 最后调用了 enhanced-resolve 提供的 Resolver 实例的 doResolve 方法。
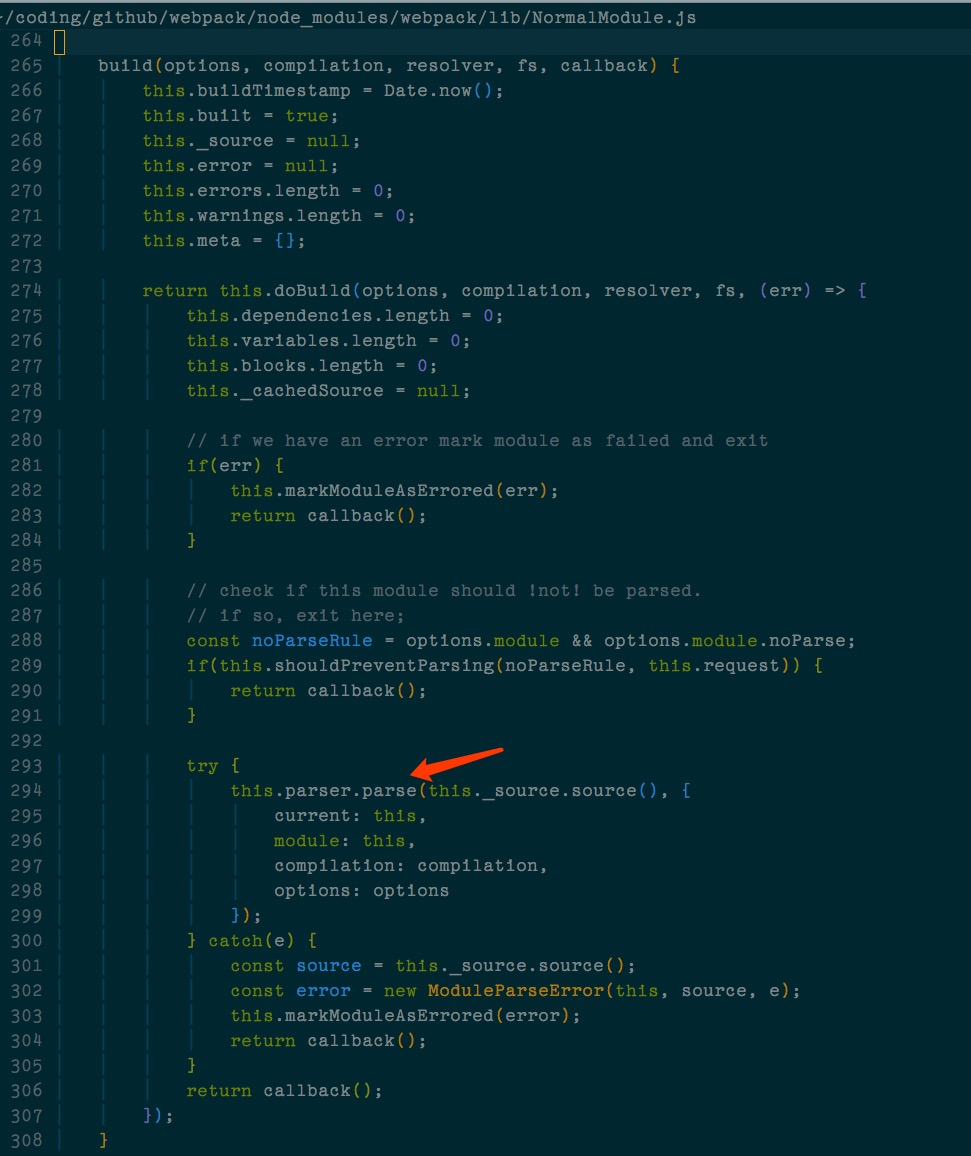
create-module 最后调用了 NormalModule, NormalModule createLoaderContext 创建 loader 上下文,最后会去调用 LoaderRunner 的 runLoaders, runLoaders 的回调完成了 sourceMap 的一些功能,最后执行了 doBuild(NormalModule 的实例方法) 传入的回调即 this.parser.parse(this 也是 NormalModule 的实例)
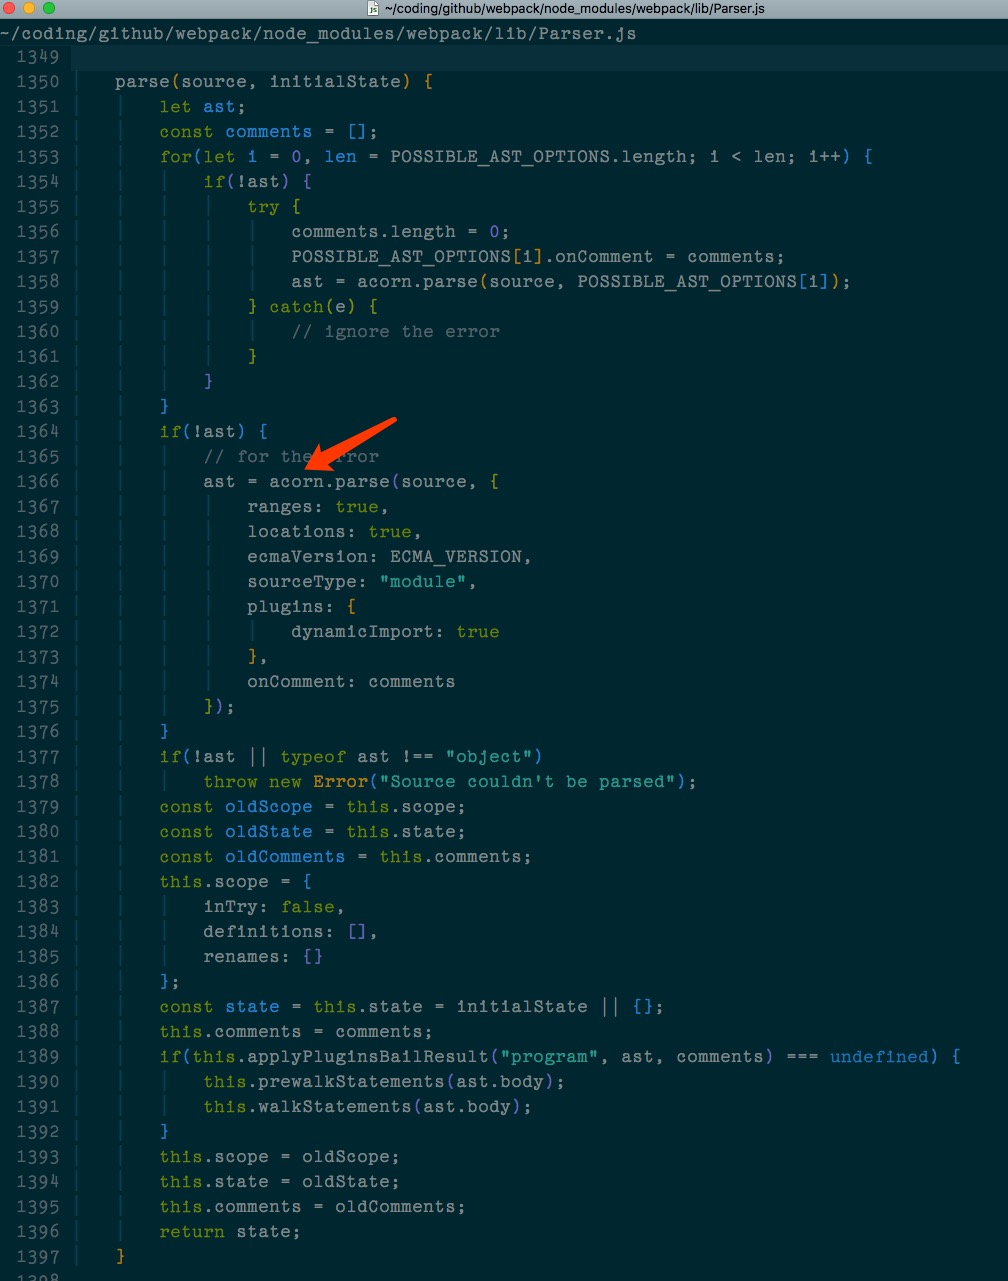
parser 的 parse 方法就是调用 acorn 解析经 loader 处理后的源文件生成抽象语法树 AST,然后触发了 program 事件
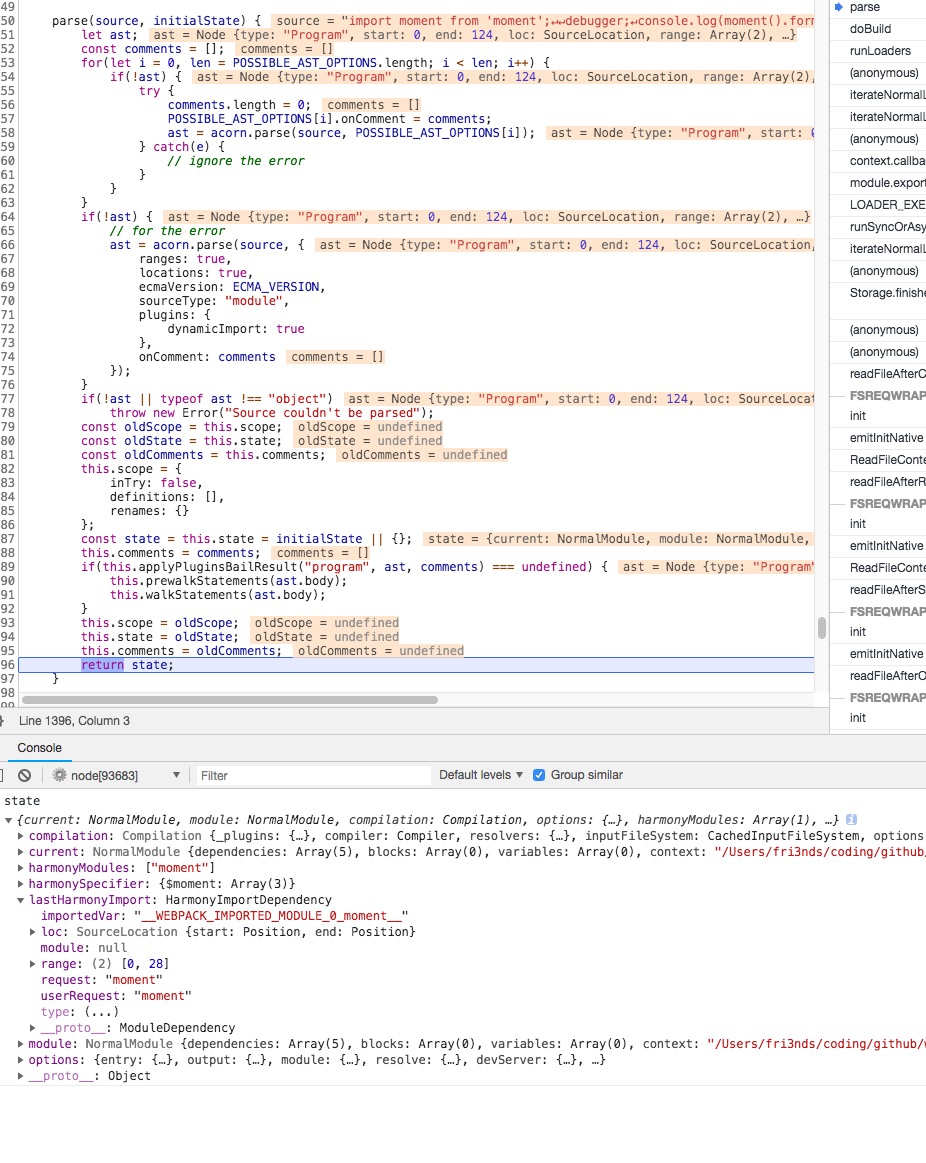
最后返回的 state 的数据如图。
递归解析完entry后,最后会调用 compilation.seal 方法。
中间的很多事件触发后,调用了 compilation.createModuleAssets 方法进行打包后代码的生成。 (未完待续…)
webpack 中的一些概念
webpack 满足其高度自定义的可能性,也带来了配置的复杂性,已经可以著书立传
module一个文件,可以看成一个 modulechunkcode splitting 后的产物,也就是按需加载的分块,装载了不同的 modulefilenameoutput 配置下的一个选项,每一个 bundle 的命名模板chunkFileName可以参考 我的回答
对于 module 和 chunk 的关系可以参照 webpack 官方的这张图
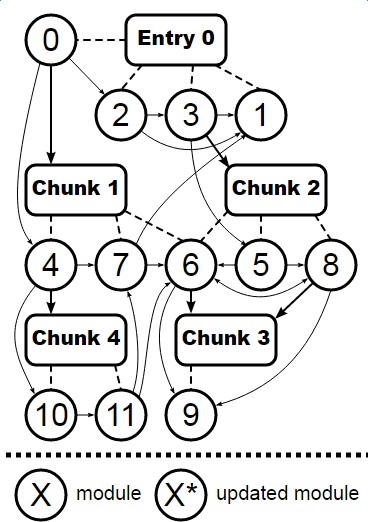
webpack 的作者也回答了 Concepts - Bundle vs Chunk 这个问题
A chunk is a bundle. Yes a chunk is a bundle. Chunk the class is the encapsulation for parts of your dependency graph. There are three classifications of Chunks:
Entry chunk: An entry chunk is an emitted file which contains the webpack runtime code. To be classified as an entry chunk, the emitted JS bundle/file must contain that bootstrap code seen above. Sometimes there will be no modules and they can be isolated into separate files. The entry chunk must always be executed first.Initial chunk: An initial chunk is loaded synchronously however doesn’t contain the runtime code.Normal chunk: The only thing that separates an initial chunk from a normal chunk is how the file is loaded. Normal chunks are always lazy loaded and asynchronous. For example when I use require.ensure, or System.import or import(), webpack will separate any of the modules into a separate normal chunk.
Is it always one chunk for output file? The only case where it is not, is when there are for example sourcemaps that are emitted alongside. These multiple assets that are written to disk are known as chunk assets.
注册插件

NodeEnvironmentPlugin 插件类必须有 apply 实例方法,可以拿到 webpack 整个 compiler 实例,
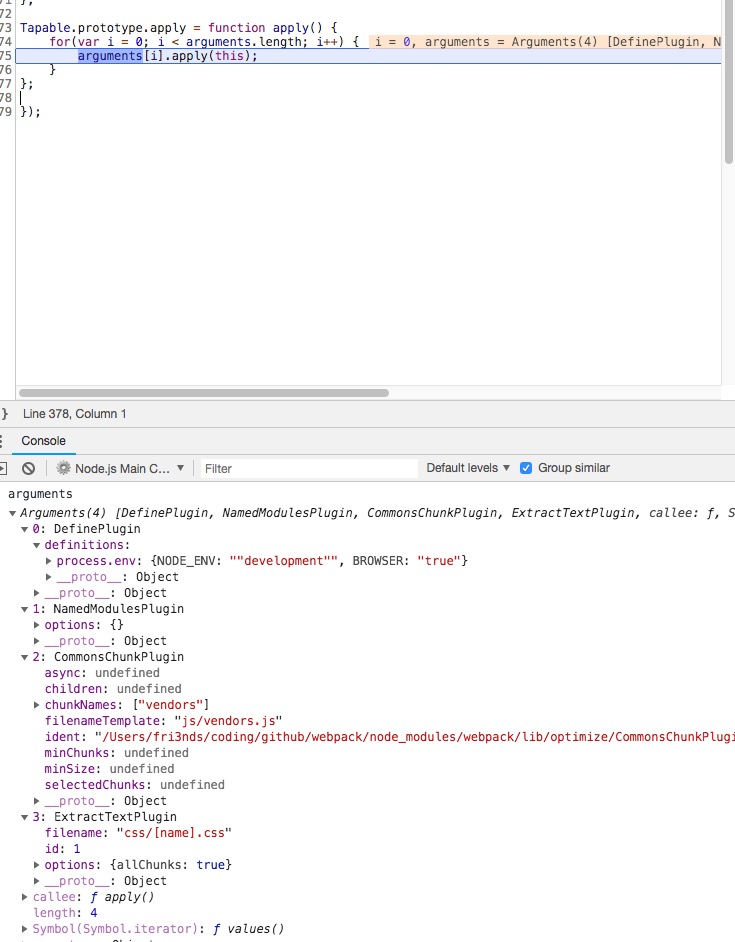
上图中的都是解析 webpack.config 文件得到的 options 的 plugins
插件通过 apply 方法,拿到 compiler 实例,在 apply 方法内,通过 compiler.plugin 方法,来注册插件。
如何编写一个 webpack 的插件可以参考 how to witre a plugin
webpack 中的一些 Tapable 实例
- Compiler
- Compilation
- Resolver
- NormalModuleFactory
- ContextModuleFactory
- Template
- Template Subclass - MainTemplate/ChunkTemplate/ModuleTemplate/DependencyTemplate
- Parser
(具体的详细解释可以查看文章)
webpack 的一些优化
- scope hoisting(作用域提升) new webpack.optimize.ModuleConcatenationPlugin() https://github.com/webpack/webpack/tree/master/examples/scope-hoisting
直观感受就是——函数声明少了很多,因此而带来的好处有:
- 文件体积比之前更小。
- 运行代码时创建的函数作用域也比之前少了,开销也随之变小。
项目中的模块越多,上述的两点提升就会越明显。
-
pure module https://github.com/webpack/webpack/tree/feature/pure-module/examples/pure-module
-
tree shaking https://webpack.js.org/guides/tree-shaking/
tree shaking 的尴尬是
- cmd 不行
- es6 有了 import 动态引入依赖
- 有些库会将最终的输出元素用Object.freeze方法包裹起来, 引入了副作用
- split Chunk
- DllPlugin和CommonsChunkPlugin(splitChunks)可以共存吗?
- 许多人在使用CommonsChunkPlugin的时候并没有注意到Webpack会将runtime一起打包进vendors文件,所以每次启动的时候,尽管你并没有修改任何第三方依赖,但是vendors文件的hash值却变了,导致浏览器缓存实际上并没有被利用起来。要解决这个问题,需要配置CommonsChunkPlugin将runtime单独打包成一个文件。
https://zhuanlan.zhihu.com/p/35407642
webpack 4 的一些新东西 http://zcfy.baomitu.com/article/webpack-4-changes-part-1-week-24-25-webpack-medium-4303.html
webpack 4 采坑小白鼠 https://zhuanlan.zhihu.com/p/37896189
我的推荐 thread-loader webpack-stylish
Tapable
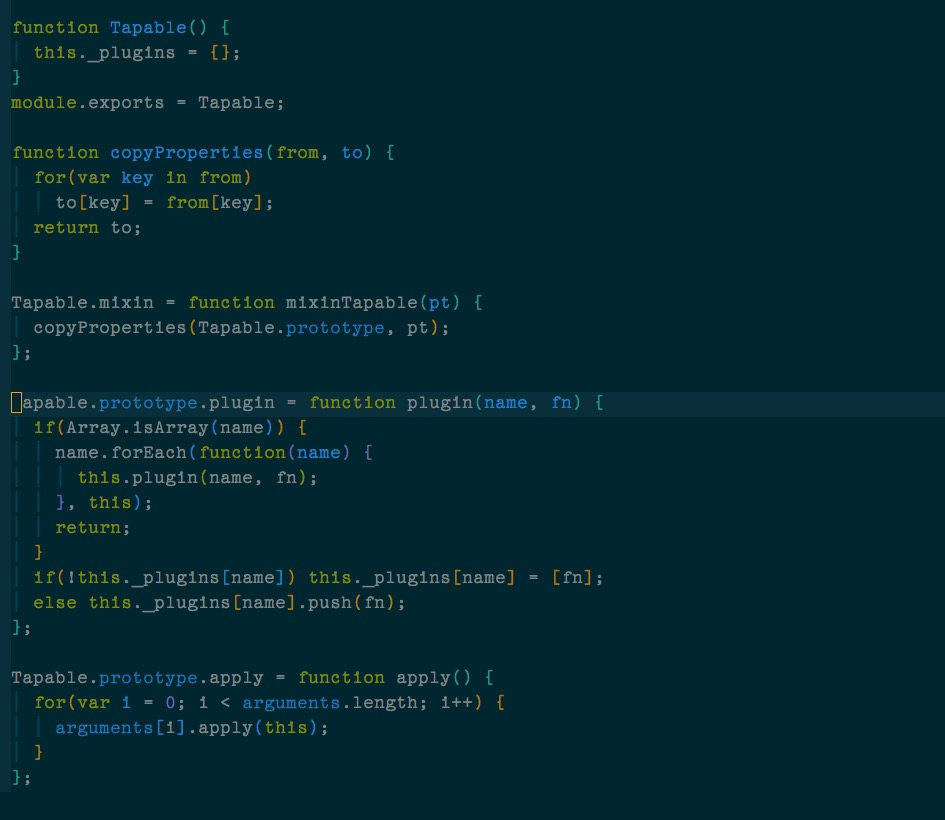
必须吐槽一下,Tapable 的方法命名简直就是垃圾,下面讲一下
apply applyPlugins plugin applyPluginsBailResult applyPluginsAsync 的区别
-
apply
注册插件
-
plugin
监听事件,并添加事件回调
-
applyPlugins
触发事件,通知插件
-
applyPluginsBailResult
触发事件,通知插件,且插件的回调必须有返回值
-
applyPluginsAsync applyPluginsAsyncSeries
注册回调,触发事件,通知插件
-
applyPluginsBailResult 触发事件,并拿到监听事件的回调的执行结果
参考文档
webpack 核心开发者写的高级老司机指南: https://medium.com/webpack/contributors-guide/home
命令行输入webpack的时候都发生了什么: https://github.com/DDFE/DDFE-blog/issues/12
细说 webpack 之流程篇: http://taobaofed.org/blog/2016/09/09/webpack-flow/
webpack 源码解析: https://lihuanghe.github.io/2016/05/30/webpack-source-analyse.html
Tapable 和 事件流: https://segmentfault.com/a/1190000008060440
webpack 主要对象: https://segmentfault.com/a/1190000008060484
如何实现一个简单的webpack: https://github.com/youngwind/blog/issues/99
webpack 详细的构建过程: https://github.com/liangklfangl/webpack-compiler-and-compilation